Saturday, December 11, 2010

Next Project - Will be for sale!!

So, as I wrap up the finish on the Book Nook, I am moving on to another project; I will post pictures of the finished Book Nook once the finish is all done.

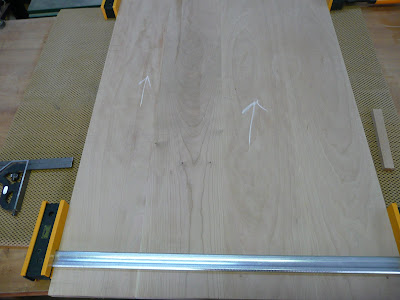
This next project is going to be a Shaker inspired side table, very similar to the bedside tables I have already done, just different dimensions; also, this piece will be FOR SALE upon completion! I have not finalized a price yet so stay tuned. Anyways, this piece will be made out of cherry and curly maple. I am using some of the same cherry that I did for the Book Nook, procured from Peach State Lumber. The "plans" I am using call for 1 1/2" square legs (I put 'plans' in quotes because I am not really going off of one specific plan, but a combination of a few). So, for the legs I am going to use 8/4 lumber to give me that finished dimension. Also, I select a board wide enough that I can get all 4 legs from the same width of wood for grain continuity. Below is a picture of how I did that.
As you can see in this photo, the grain all lines up so you know it all came from the same board. How I keep them all lined up prior to cutting is by numbering them and putting witness marks on the end of the board.
Once all the leg pieces are rough cut, I use my Lee Valley low angle smoother to smooth all side of the legs to final dimensions. This smoother leaves a surface that is glass smooth and ready for finish; I love this thing! Take a look at these full length shavings.
Ok, enough for now. My next order of business will be to mill up the parts that will make up the sides and back. Then I will work on the mortise and tenon joints to hold it all together. So, until then...

Be Safe!

Friday, December 3, 2010

Book Nook - Part 2

So, last time I left off I had routed the dados to receive the shelves. My next order of business as to mill up the trip pieces that will also provide support for the shelves and provide the front lip on the shelf to keep the books from slipping off. Also, I had to drill holes to receive the cross braces that will keep the books from falling forward.

So, I milled up some 3/4"x2" pieces, routed a profile on them and also put a 3/8"x3/4" dado in the back of the trim pieces so that they will slip into the front of the shelves.
This is a shot that gives you an idea of the profile and the lip the trim puts on the shelf (my photography isn't too good)
Once that was done, I had to drill the holes to receive the dowels for the cross braces. To do this, I used the same process where I lay the sides back-to-back so that when I lay out the places for the holes they will be perfectly aligned.
Ok, once that was all done, I had to take some time and put a profile into the sides of the book nook so that they weren't just square and boring. So, after about 12 tries, here is what I came up with.
I'm pretty pleased with that look and I think once it is done will give it a nice profile/look.

Ok, once that was all done, I did a quick dry fit and then it was time to glue it up! Big milestone...

Let me just first say, this was the most frustrating glue up I have EVER done. Oh man, did I ever need an extra set of hands to do this. Anyways, I got it done and below are a couple shots of the sides, shelves and braces all glued up. NOTE: notices the top back piece is also in; I had to do this because I had to put dados into the back to receive the back; you can see that dado in the pictures above.


Now, I just have to let that set for a while to dry up and then I will come back and glue all the trim pieces on. Once that is done, it is the pains taking task of removing any glue squeeze out and final sanding and then it is "off to the finishing room". I can see the light at the end of the tunnel!

Be Safe!

Tuesday, November 30, 2010

New Project - Book Nook - Part 1

Alright, alright, time for a new project! I was asked to build a children's bookcase that would hold books with the covers facing outward instead of the traditional binding facing outward; kind of a book display really. I did a little research and found these are typically called a Book Nook. These are pretty interesting, and pose some unique challenges, because of the dimensions; typically they are only a foot deep, about three feet tall and about 4 feet wide. What got me was only being a foot deep; I felt that this would make for an unstable design. I did notice in my research that many of them had a way in which to fasten the top of the book nook to a wall for stability.

So, with all this in mind, I decided on the final dimensions and design. This one will be 12" deep, about 42" wide and about 36" tall. It will have 3 shelves with each shelf capable of holding about 4 books side by side and roughly 3 or 4 deep. I also decided that this piece will be made in cherry and the finish will be BLO and shellac, no stain.

My first order of business as was to make a trip to Peach State Lumber and get the cherry I would need for the project. I decided I wanted 8/4 cherry so I could resaw it for the sides, since I knew I would have to glue two pieces together. I literally had to go through the entire pallet to find the boards that would work for me, but sometimes you have to do that. So, here are the boards I picked up:
I did get more than I needed because I will be using the rest for another project once I'm done with this. My first order of business was to mill the lumber square so I could resaw it on the band saw. Some of this required the use of hand tools, which I don't mind.
Once that was done, they were resawn on the band saw and laid out for glue up. Here you can see the book matched pieces, ready for glue up. I always make some kind of witness mark on the boards so I know exactly how they should be put together.
Once I had both side panels glued up, it was now time for the tedious process of laying out for the 3 shelves. I wanted them to be equally spaced both vertically and horizontally. I did this by laying them back-to-back so that I could just transfer the lines from one to the other and know they were in perfect alignment. Here are the two side pieces laid back-to-back with the insides facing up.
Also note that I make sure to mark the grain direction; that is was the arrows are for. This just helps me keep everything flowing the same direction. Next, I had to do all the layout lines, which took a good while because I wanted to be exact and there were some design features that I had to take into account. After the layout was done, I used a router to rout out a 3/8" deep dado for each shelf and then used chisels to square up the dados.
So, my next order of business is to mill up the pieces that will be for the front and bottom trim. These trim pieces will serve multiple purposes. First, they will have a dado in them that will allow them to fit into the shelves so that will help to keep the shelves from sagging by adding support. Next, they will stick up from the front edge of the shelf about 1" which will provide a lip for the books to set into so they don't fall off the shelf and lastly, the will have a profile on them to add character. Once I have those trim pieces done, I will also begin to build the back of the shelves. That is all I've got for now....

Be Safe!

Thursday, November 11, 2010

Woodworking blog Woodworking Magazine - A Dovetail a Day – Hurray

So, the other day I was just posting on how I am practicing my dovetail cuts so that I can get better at hand cut dovetails. Well, yesterday, Chris Schwarz posted a blog entry about an article he did 2007 where he set out on the same task as I am undertaking. What he did was to make a dovetail a day until he got better at it. One of his readers, Bob Jones, followed along and did a dovetail a day for 90 days! I don't know if I can manage one a day with my schedule or not, but it is definitely worth a shot if I can get results like Chris and Bob. The blog post is below and a free copy of the original article can be found, either at the bottom of that post or here: FREE DOVETAIL ARTICLE

Woodworking blog Woodworking Magazine - A Dovetail a Day – Hurray

Monday, November 8, 2010

Dovetails - Practice, Practice, Practice

One of the things I really want to do as a woodworker is get better at cutting dovetails by hand. This always seems to be a crowning moment for a woodworker, and is one of the highest achievements it seems. I think it is a mental thing, but once you can, consistently, cut high quality dovetails by hand, you feel like you can do anything in woodworking. So, I'm on a quest to get better at them, by hand. I've read a couple books, watched some videos and even tried some on my own; not successfully mind you. One of the things that I have read, and watched, over and over is to practice cutting straight lines. And I thought "Practice?! Practice? Are we talking about practice?" heck, I can cut a straight line, I don't need to do that! Well, if I can cut a straight line, every time, then why can't I get good dovetails? So, putting my ego aside, I decided to do what many expert woodworkers probably did in their apprenticeship....practice.

So, I set out to cut a bunch of lines to get used to cutting on a straight line, but also cutting to my scribe line, or shoulder line. I took a slightly different approach though; see, when you practice something, you practice in the same way you would execute whatever it is you are practicing for. So, in that spirit, I decide to no just cut straight lines, but to practice the types of cuts you would make when doing dovetails, skewed cuts and angled cuts. So, with that, I grabbed a piece of 3/8" walnut, laid out a bunch of lines, and started cutting.
Here you can see that, for the most part, I can cut a straight enough line; some on the left got a little crazy, but what I noticed is I need to do a better job of cutting to the line as on several of these, I went right past it.

This is a shot of the top of the practice board. Again, consistent angles all parallel to each other. These were laid out to simulate the types of cuts used when cutting the pins of a dovetail.

Next I grabbed a piece of 3/8" mahogany and made a series of cuts that would simulate cutting the tails.
Again, pretty consistent, but still room for improvement. My cutting to the line was much better on this one.

All-in-all, I think my cutting is pretty good. I definitely am going to do another round or two of practice cuts to get even more consistent; I also think I am going to practice cutting to save the line;personally, I think this is why mine just don't come out well. So, practice, practice, practice I shall do!

Be Safe!

Saturday, November 6, 2010

Interview with plane maker Steve Knight - Fine Woodworking

Steve Knight makes, or used to make, really nice wooden hand planes. Now he makes them as kits; super high quality. Here is an interview from Fine Woodworking and Steve where he talks about that transition from finished planes to kits...

Interview with plane maker Steve Knight - Fine Woodworking

Wednesday, July 28, 2010

Coffee Table Done!

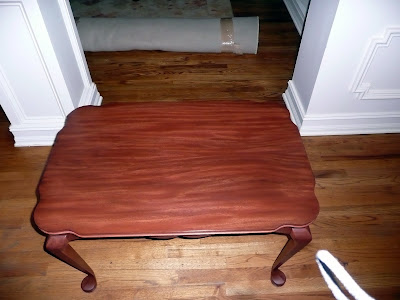
Wow, it has been forever since I have posted anything! I finally finished the coffee table I was working on. It took a lot longer this time because the top really gave me fits. The wood has some amazing figure/grain in it, but that is also what makes it so hard to work with. I ended up having to build the top three different times before I got it to come out right. Here are some pictures of the finished product.


Be safe!

Saturday, March 27, 2010

Coffee Table build

I've made some progress on the coffee table. I am glad I kept all my jigs and templates from the last time I made this table; it is saving me a lot of time. My next task was to mill all the rough pieces down to final dimension to get them ready. Here I am sawing the 12/4 pieces down to make the aprons, which are 3/4.
From ChrisJanetCoffeeTable


Here all the apron pieces are roughed out and now just need to be planed to thickness.
From ChrisJanetCoffeeTable


I also cut the leg blanks to size and planed them to final thickness, which is 2.75" square.
From ChrisJanetCoffeeTable


So, I will let those pieces sit overnight and then begin to cut the cabriole legs next time.
From ChrisJanetCoffeeTable


Be Safe!

Sunday, March 21, 2010

Commissioned Coffee Table

Ok everyone! Fresh off of the finish of my Walnut Media Cabinet build:
http://woodworkersblog.blogspot.com/2010/03/media-cabinet-is-complete.html

I have gotten started on a commissioned piece which is a replica of a mahogany coffee table I built last year. So, All I have done thus far is to cut, to rough length, the pieces I need.

Here I am doing the "slap test" where you cut about an inch off of the end and slap it on the ground and if it breaks, you take another inch....this checks for potential fail points in the wood. This particular piece is 12/4 so I can only make it so far with the Skill saw then I have to hand saw the last little bit
Image

Here are all the rough cut pieces laid out. The top (closest to the bottom) will be resawn. The legs are 12/4x9" and the aprons are 12/4x9" as well and will be resawn to final dimensions.
Image

I've made this piece before so I am familiar with it, but still need to be careful. The finish this time will be different as well, per the customer request, so you may seem some questions about that.

So next I think I will rough cut the legs and work on laying those out. I will also begin to mill the top.

Stay tuned! I have been in the play-by-play before and already finished one piece! WHO'S BETTER THAN ME?! ok, I know at least one person :D

Saturday, March 20, 2010

Media Cabinet is COMPLETE!

Project finished! My favorite part of a long build. I haven't posted much in regards to the progress because all I have been doing is applying the finish and hardware; had a week vacation in there too where no work was done. Anyways, here is a shot of the cabinet in the shop all finished.
From MediaCabinet


Here is a shot with all the doors open.
From MediaCabinet


And here is a shot of it in its final "resting place".
From MediaCabinet


Overall, this was a fun project. If I had to do it again there are a few things I would change, but overall I am happy with the way it came out.

My next project is going to be another coffee table, just like the other mahogany one I did last year; this is a commissioned piece though so I will get some money, which is always good!

Be Safe!

Saturday, February 27, 2010

T-Chisel gets a show!

As some of you may, or may not, know I'm a fan of Tommy MacDonald, aka T-Chisel, over at t-chisel.com. His work is amazing and the videos he has are some of the best around; they are raw, real and chock full of information. I recommend spending some time, a lot of time, and going through the bombe secretary videos; this piece is AMAZING! I love to go back and just watch some of these videos as they are just inspiring to me in the fact that Tommy does an awesome job of taking something that is complicated, or seems daunting, and breaks it down into its most simple form and makes it look easy. It was this inspiration/attitude that made me want to build the coffee table with a double bead time, cabriole legs, etc. Definitely check out his site and his videos; heck, sign up for the forum too!

So anyways, today I was cruising around The 207 Forum and came across a post that mentioned that Tommy is in the process of getting with WGBH out of Boston. This would be amazing! I know the shows would be better "quality" in the fact that the videos that Tommy has on his site are pretty raw with him walking around with a camera on a tri pod, but there is something neat about that to me. Anyways, I think it would be amazing for Tommy to have a show to validate the hard work he has done, and put on display all of his amazing work and talent. The other great thing about Tommy is how much he gives back to the woodworking community. Just look at his videos and all the information he gives for free on those things! Also, the 207, there are some great build alongs and other things on there; just full of information.

Below is a video "announcement" of the show...check back with his site for more details:

Tuesday, February 23, 2010

Media Cabinet - Final Stages

Well, I am in the final stages of the media cabinet! I'm pumped and can see the finish line. Over the weekend we finally had some amazing weather so I was able to spend a good deal of time working on the cabinet. I was able to rout the profile around the bottom of the cabinet and then glue the vertical partitions into place. Next, I was able to dry fit all of the back panels; for these I just used ship lapped panels that will free float. One thing I did was to leave a good bit of space in the center section, at the top, to allow plenty of air flow and cable routing. I also took a page out of Marc Spagnuolo's book and his media cabinet build where he inset the middle back panel a couple of inches so you could put the power strip there and all the cable routing would fit in there and be hidden and allow you to put the cabinet further against the wall; great idea!

After the vertical partitions were dried, I got to work final fitting all the shelves and got those lightly glued into place. Lastly, I put the center doors back in and did the final fitting of those to make sure I had enough clearance all the way around each door. Then it was time to do any glue removal and finish sanding to prepare for the finish. One thing I like to do is to wait a few hours for the dust to settle, literally, then wipe the whole piece down with mineral spirits. This does a couple of things. First, it gets all the saw dust off of the piece. Next, it allows you to see any blemishes or glue spots that you may have missed and allows you to touch those up before putting on the finish.

For the finish I am applying a couple coats of Watco Danish Oil. Once that is good and dry (after a few days) I am going to spray several coats of shellac on it. This may be about another week or so away as the weather is supposed to turn pretty cold again for the next several days.

A couple construction Items I still need to do are to scrape and sand the top, rout the profile on it and apply the finish. I also need to feet on the base as well, but that will be last. Nearing the end!

Be Safe!

Friday, February 19, 2010

WoodTreks - Great Woodworking Site!

About a month ago I stumbled across a great woodworking website I had never seen before, nor ever heard of; that site is WoodTreks. WoodTreks is a video blog by woodworker and filmmaker Keith Cruickshank. When I first saw the site I thought "man, this is kind of cool!"...then after about 4 straight hours spent on the site I thought "man! This IS cool!". The site is all video podcasts and has several categories from materials, techniques, tools as well as artisan profiles; I really like the artisan profiles, and the materials videos are pretty incredible you get to walk through a lumber mill and see how they process logs.

When you watch one of the videos, one of the first things you think is "is this from a TV show?". Keith's film making background is very apparent in the great quality videos and sound. What's even more neat, to me, is you don't even know he's there...it's like you are standing there with the artisan and they are talking to you.

About the site itself. One of the first things you notice about the site is how clean it is; no unnecessary graphics, no ads, no pop-ups, just great content. Next, when you click on the videos, again, no ads, no endorsement, nothing...except if you consider "watch more of my free videos" an ad or endorsement. Oh, did I mention free? Yep, free! No subscription, no registration, just click on the video and go! You can, as I have, subscribe to his site, via an RSS feed or through email, if you like as well so you don't miss a single episode. While you are there, don't forget to go to the Links section and check out some of the other blogs and sites that Keith has there; there are a ton of great sites there.

WoodTreks, it's full of great information, it's clean and concise, and best of all...it's FREE!

Saturday, February 13, 2010

Media Cabinet - Pocket Doors Completed

So I was able to get some shop time in today and work on the pocket doors. In my last post, I was making the center door panels. I got those all milled up, door built and ready to go. I used my mock up for a little while back and drilled out the door hinges, mounted the slides and was off to the races. Here is a shot of the two doors mounted and side-by-side.
From MediaCabinet


They overlap about 1/8" in the middle, which is ok as it will allow me some room to trim and true up the doors. Here is a shot of the doors opened.
From MediaCabinet


I sort of messed up when I ordered the hardware because, as you can see, the doors to slide back all the way. When I was ordering them, it was not clear to how much travel they would have, but I got sign off from the boss (wife) that it was fine the way it is.

So, that is all I wanted to get done today, so mission accomplished. I still need to clean the glue from the doors and sand them down a bit. I'm in the home stretch though! All I need to do now is mill up all of the shelving, rout the profiles into the top and bottom, add the feet and apply the finish. Here are a couple more shots of the front with the two side swing out doors set into place.
From MediaCabinet


From MediaCabinet


Be Safe!

Monday, February 8, 2010

Media Cabinet Progressing

Over the weekend I was able to get a good bit done on the Walnut Media Cabinet. Last time, I had cut the first set of dado's into the bottom to accept the vertical partitions. What I needed to do, after fitting the outer partitions was to construct the swing out doors. I need to do this before routing the next set of dado's so I know exactly where they are supposed to go; basing the cuts off of the actual piece and not pre-determined measurements has saved me a few times.

First I needed to route the dado for the two shelves that will be in the swing out doors.
From MediaCabinet

Then I attach the bottoms, which are dovetailed.
From MediaCabinet

Then I glue them together. Here you can see the front of one, and the back of the other.
From MediaCabinet

Once that is done, I use these doors to mark the location of the next set of dado's for the inner partitions and rout them.
From MediaCabinet

Here are the partitions just dry fit so you can get an idea of how it will go together.
From MediaCabinet

Notice how the outer partitions do not come all the way to the front; that is where the swing out doors go. This is a close up of the partition in the dado.
From MediaCabinet

I'm using pocket doors for the two center doors. I've not used them before so I am doing a little pre-layout so I know what to expect with my real doors.
From MediaCabinet

Next, I needed to begin to construct the two middle doors. So I book matched some 8/4 boards to make the center panels.
From MediaCabinet

I just love the grain on these, especially the one on the left. I actually didn't see this grain until I had milled it and cut them apart. Now the are glued up and ready for me to route the profiles on them and assemble them, just like the doors before.

Once these doors are put together I am going to see what wood I have left and what is left to be done. I thought I would have enough to do the whole thing, but I am going to be short on the wood needed for all the shelves and the back panels. So it will be back to the lumber yard this week so I can be ready for the weekend.

Be Safe!

Friday, January 29, 2010

Media Cabinet - Plugging along

It's been a while since I have given an update on progress. Mostly, the progress hasn't been anything too exciting, or exciting enough to write about, but I figured I should anyways. So last time I left off I had made the doors and and had begun to scrape all the glue lines for the top. I have since then finished all the scraping; I had to scrape the bottom platform and all the side pieces...basically anything that I had joined. Next I turned my attention to the two swing out doors. These are for holding games and DVD's. To keep things simple, and looking good, I decided to go with half-blind dovetails to joint the sides to the bottom (there is not top). So I set it all up in my Leigh jig, made a couple test cuts and knocked them out.
From MediaCabinet

I had a little tear out on the first one because I forgot to use a backer board. This joint is on the bottom anyways so it will never be seen.
From MediaCabinet


Next, I figured I would start on the top. It takes a while to glue the boards up so I figured now was a good time to do it because while the glue dries I can work on other items. So, the top is to be about 65" long by 22" deep. I started with a long 12/4 piece of wood. This I will resaw three times to get my three pieces need to make the top. I have an 8" jointer and this board was wider than that so I had to initially flatten it by hand. For those not familiar with doing this, a good way to get started is to use chalk and mark up your board.
From MediaCabinet

This allows you to know the areas that you have, and have not, planed. Then, you use something like a #4 and begin to work up and down the board at a pretty big angle, somewhere between 45 and 60 degrees.
From MediaCabinet

This is a shot of about half way though. You can see the center of the board still has chalk, this tells me that I have not yet gotten the whole thing flat. If you look at the part of the board closest to you, you can also see the plane marks and the angle of approach I am using. As you get it more and more flat, you begin to decrease the angle and then eventually switch to another plane to finish it off.
Here are the three, book matched, boards after being resawn and planed to thickness. By the way, resawing a 12/4 piece of wood 70" long is a real treat!
From MediaCabinet

It's not the greatest picture in the world, but I think you can get an idea for the triple book match. This is something that sets one piece of work apart from others so take note when looking at "antique" furniture and the quality of work.

Next, I needed to layout and begin routing the dado's for the vertical panels. I'm starting with the two outer most panels, these only come in just over half way as they are part of the swing out door assembly. I always turn into a nervous wreck when I have to do things like this because if you mess it up, all that wood and work are ruined. Anyways, I made the first two with no problem.
From MediaCabinet


So next I need to rout the dado's in the swing out doors that house the shelves for the storage. This will be two dado's on each side. Once I have those in, I will then glue up the swing out doors and use those to aid me in laying out where the next dado's go for the middle, full length, vertical panels. More on that later though!

Be safe!

Saturday, January 16, 2010

Media Cabinet - Progress on the doors

So with starting back to work on my normal job, I haven't spent a ton of time this last week on the media cabinet, just a little bit here and there. I was able to do some work on it today. During the week I was able to work on getting the base glued up. Below you can see where I am gluing up the long stretchers. As you can see, I don't have any clamps long enough for this so I had to improvise.
From MediaCabinet

So today I decided to do some more work on the doors; specifically the two outer doors. These doors are 26" tall by 13" wide. As I mentioned in my last post, the center panel is one solid piece of wood. What I worked on today was to mill up the rails and stiles. I am using 2" rails and stiles so once I got them cut and planed I used my matched rail and stile bit to rout the pieces. Here are the individual pieces.
From MediaCabinet

And here they are loosely put together.
From MediaCabinet

Here is one door dry fit, without the center panel obviously.
From MediaCabinet

Next, I took the two center panels and used one of my new vertical raised panel bits and routed the panel profile. Here is a glimpse at the profile.
From MediaCabinet

Here is one door dry fit. Note the chalk marks, this is how I keep track of where each piece goes and how they should be oriented.
From MediaCabinet

Straight on look.
From MediaCabinet

Also note that the I kept the stiles about 1" longer; this is on purpose so I can lay the door flat, make sure the panel is centered for glue up and then trim it to exact length. Here are both doors together.
From MediaCabinet

Well, that is all I was able to get done today really. Next I need to finish gluing the bottom together and then I need to do a little trick to them to re-enforce the mortise and tenon joint. Next, I am also going to turn my attention to the bottom panel and take my card scraper to it to get all the glue off from the glue up and work on flattening any unevenness. Hopefully more on that tomorrow!

Be Safe!