Showing posts with label Workshop. Show all posts

Wednesday, March 30, 2016

Where have you been all this time?!


Wow, it has been a long time! It is hard to believe that my last post was January of 2011. A lot has changed for me since then, which is why I haven't been posting in a while. The biggest reason is because we have moved...twice and as a result, all of my woodworking equipment had been in storage. However, part of all these moves and changes is the fact that I have had the opportunity to build myself a standalone "dream shop"! So, my power tools have been rescued and are now in their new home. So, let's start there, the new shop...

I have been blessed with the opportunity to build myself a free-standing wood shop, a blank slate, to turn into my dream shop. So, I built a 32'x24' shop with 10' ceilings. Here is a shot of it being built.


As you can see, it has two garage doors on the front, a side entrance and it also have two windows on each end. I also installed two, powered, attic exhaust fans in the roof that I can control with a switch. I did this in order to circulate hot air out, but to also exhaust any fumes when doing finish work.

Working with a blank slate is a dream, but in some ways, also a bit of a nightmare; where do I put things? Where will lumber go? Where do I put this piece of equipment and that piece? Etc, etc. It is fun though and, let's be honest, a shop is never truly "done" is it? In designing my shop, I knew I wanted a few things for certain. First, I knew I wanted the outlet boxes to be cabinet height, that way, any cabinets or equipment that I put against a wall will not block any outlets. Second, I wanted lots of 110V and 220V outlets scattered throughout. Next, I wanted all 110V outlets to be quad outlets. I knew I wanted the walls to be covered with wood paneling and not drywall. Next, as much as possible, everything should be mobile (with a couple exceptions). Lastly, I knew I wanted everything that goes on the wall to use a French cleat system, that way I can move anything anywhere as my needs change over time.

So, what did I come up with? Well, here are a few shots of my shop as it is so far (subject to change without notice of course). This first shot is the right hand wall as you enter the shop. This is where all the lumber comes in, gets stored and broken down for projects.

I have my miter saw down here, along with a circular saw, jig saw and track saw, which are stored in the same mobile cabinet that my miter saw is on. This means that most, of not everything, I need to break down everything from rough lumber to sheet goods is all in one place. Now, I chose to store my lumber vertically for a couple of reasons. In my last shop, I stored it horizontally, and it took, basically an entire wall. It was also really hard to sort through the lumber in a meaningful way like that. By storing vertically, I can store a lot more lumber in a smaller area and it makes it so much easier to sort through. Here is a link to a more detailed picture of the lumber storage, but it is basically black pipe flanges and 12" pipe bolted to the wall. The wood also sits on a wooden "step" on the floor.

As we move from right to left, we begin to see how wood also moves through the process as you now run into the jointers (I have a 6" and 8") and planer.

So, after I break down the pieces, I can simply turn around and than begin to mill the pieces. Once they are milled, you move to my workbench and table saw; the heart of the shop. 

There is a lot going on in this shot, and some I may need to explain in another post, but the point is, after pieces are milled, I can cut to width and length at the table saw and also begin joinery layout at the workbench. I also have clamps near the bench, you can see my Rigid sander near the bench as well; this also holds all of my power sanders and sandpaper. Because I also use a good bit of hand tools, they are stored under the bench in drawers and I have a sanding station right next to the bench as well. 

So, as you can see, the shop is not done yet, but I don't think they ever are. I still have a good bit of insulation to get installed, wall board to be hung, extension table for the table saw, etc, etc. The good news is though, it is a functional shop that I can start building projects in right now, and I already have two in the works! 

I am so thrilled to be back woodworking again and, boy, has the woodworking world changed in the last 4+ years or what?! More on that in another post maybe, but in the meantime, I am glad to be back!

Thank you all!


Tuesday, November 30, 2010

New Project - Book Nook - Part 1

Alright, alright, time for a new project! I was asked to build a children's bookcase that would hold books with the covers facing outward instead of the traditional binding facing outward; kind of a book display really. I did a little research and found these are typically called a Book Nook. These are pretty interesting, and pose some unique challenges, because of the dimensions; typically they are only a foot deep, about three feet tall and about 4 feet wide. What got me was only being a foot deep; I felt that this would make for an unstable design. I did notice in my research that many of them had a way in which to fasten the top of the book nook to a wall for stability.

So, with all this in mind, I decided on the final dimensions and design. This one will be 12" deep, about 42" wide and about 36" tall. It will have 3 shelves with each shelf capable of holding about 4 books side by side and roughly 3 or 4 deep. I also decided that this piece will be made in cherry and the finish will be BLO and shellac, no stain.

My first order of business as was to make a trip to Peach State Lumber and get the cherry I would need for the project. I decided I wanted 8/4 cherry so I could resaw it for the sides, since I knew I would have to glue two pieces together. I literally had to go through the entire pallet to find the boards that would work for me, but sometimes you have to do that. So, here are the boards I picked up:
I did get more than I needed because I will be using the rest for another project once I'm done with this. My first order of business was to mill the lumber square so I could resaw it on the band saw. Some of this required the use of hand tools, which I don't mind.
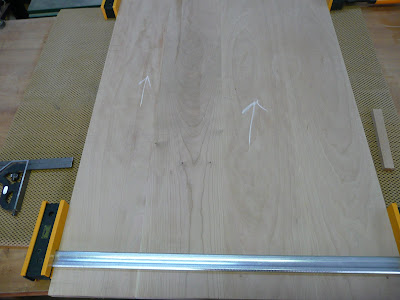
Once that was done, they were resawn on the band saw and laid out for glue up. Here you can see the book matched pieces, ready for glue up. I always make some kind of witness mark on the boards so I know exactly how they should be put together.
Once I had both side panels glued up, it was now time for the tedious process of laying out for the 3 shelves. I wanted them to be equally spaced both vertically and horizontally. I did this by laying them back-to-back so that I could just transfer the lines from one to the other and know they were in perfect alignment. Here are the two side pieces laid back-to-back with the insides facing up.
Also note that I make sure to mark the grain direction; that is was the arrows are for. This just helps me keep everything flowing the same direction. Next, I had to do all the layout lines, which took a good while because I wanted to be exact and there were some design features that I had to take into account. After the layout was done, I used a router to rout out a 3/8" deep dado for each shelf and then used chisels to square up the dados.
So, my next order of business is to mill up the pieces that will be for the front and bottom trim. These trim pieces will serve multiple purposes. First, they will have a dado in them that will allow them to fit into the shelves so that will help to keep the shelves from sagging by adding support. Next, they will stick up from the front edge of the shelf about 1" which will provide a lip for the books to set into so they don't fall off the shelf and lastly, the will have a profile on them to add character. Once I have those trim pieces done, I will also begin to build the back of the shelves. That is all I've got for now....

Be Safe!

Wednesday, January 21, 2009

Workshop Reorganization

Well, I've decided to use the really cold weather here in the South to reorganize my shop. I'm working from a 2 car garage that measures about 21'x21'. My shop always seems to be a work in progress anyways, always changing and rearranging. I don't make any one particular type of furniture so I can't exactly set it up for, say, cabinet making, or chair making, etc. I'm trying to take the best advantage of my space, while keeping a good portion of floor space available. I also try and keep everything mobile. Here are a couple pictures of what my shop used to look like.
From ShopPics
From ShopPics

It has changed a lot since that picture, but the layout is very similar; table saw on the side of the shop, butted against the wall, band saw in between the garage doors, work bench behind the table saw, dust collector tucked in the corner with PVC ducting runs and then other items such as planer, miter saw, sander, etc on mobile bases. Since this time I have added a few things such as a clamp rack, 8" Grizzly jointer, Grizzly lathe, wood rack and some other odds and ends.

So, since that time I've tried to utilize more space. One thing that I decided upon before starting this is that I am going to start breaking down sheet goods in another part of the shop; trying to rip a full sheet of plywood by myself is difficult, dangerous and a pain. I've decided that when I do use sheet goods, I'm going to break them down on saw horses with a long straight edge and circular saw, then over to the table saw. So, with that, this is my new layout. I'm going to run with this for a while and see how it works out. In this first shot, this is the view from the door from the house into the garage; along this wall are my Ridgid planer, 6" Grizzly jointer, Delta mortiser and Craftsman drill press. I also have my router cabinet at the far end. My Grizzly band saw is in the same place in between the doors.
From ShopPics

The next shot continues to the right and shows my bench now tucked directly up to the tablesaw, and my table saw in the middle of the garage; I really like this layout. You can see my Harbor Frieght dust collector, my air compressor is tucke in that back corner, and my Grizzly 8" jointer. Also, you can see part of my lumber rack on that wall; I don't keep a lot of lumber around so these racks work great.
From ShopPics

This last picture shows the rest of the shop, this is from one of the garage doors looking into the shop. Here you can my plywood storage on the left (where my DC used to be), then my new Grizzly lathe, my Ridgid spindle sander, clamp rack, miter saw and small power tool storage under that.
From ShopPics

All in all I like this layout so far. I still have some random things to do like clear some more clutter out and re work the small extension table on my table say; I need it to extend the entire width of the back of the saw and right side table, right now there is a gap and this would give me more work space. Also, with this layout I basically have one garage door wide open so I can bring in lumber there, put it on the rack (right by the jointer) and prep it. Also, for sheet goods, I have enough room to layout some saw horses and break down the sheets and then move right to the table saw for the rest of the work. I do need to do a little work with the dust collection. Right now I don't have a good way to get a dedicated pipe to the 8" jointer without running it across the floor right where I would bring lumber in. I may by a long piece of flex hose and use that so I can unhook it whenever it's not in use.