Showing posts with label cherry. Show all posts

Monday, October 17, 2016

Office Desk Build (Final)

In Part 2 of the Office Desk build, I covered the joinery process for the base, which was all mortise and tenons. In the final part, we sort of put a lid on this project by putting the top on and going through the finish.

Top Construction

The tops finish thickness will be 3/4" so I started with 4/4 rough cherry and milled it down. As you may recall in the Part 1 post, I had already laid out what pieces the top would come from. I do find though, that you really don't make that final decision on which pieces go where until you've run the pieces through the jointer and planer and see the true grain patterns. 

The milling process is pretty standard stuff; start with the jointer, get one face flat, then use that face against the jointer fence to get one edge straight and square to the face. Then, over to the planer to get the pieces to their final thickness. Once that is all done, I lay the pieces back out to get the best "show faces" and grain patterns that are most appealing to me.

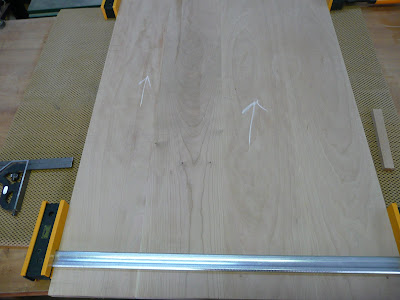
This pattern was the one I liked the best, so once I have it the way I like it, I put a witness pattern across the pieces so I know which board goes where during the glueing process. Once the glue-up is done, I use my Lee Valley bevel up smoother to get rid of mill marks and any glue residue on the top.


Shaping the Top

While thinking through the design of this desk, I really didn't want to just have a plane square top. I wanted the top to be a little different, a bit more inviting and have a nice look to it. What I came up with was to make the front edge have a concave curve to it. I felt that, this way, you could really get your chair up close to the desk, and have a natural place for your arms to rest nicely. Here is that edge:

Once I formed this edge (on the bandsaw by the way), I used my Lee Valley spoke shaves to create a rounded under bevel on the bottom edge of this curve, which you will see in the finished pictures below. I thought this would be a nice details and trick of the eye and, honestly, I was just playing around with ideas at this point and, since the piece is for me, I can do that.

Finish and Finished Product

The finish on this piece follows the principles I try to usually follow, keep it simple and natural looking. So, for this piece I opted for a Tung oil finish, about 3 coats then a wipe-on polyurethane over that (after letting the oil set for a couple weeks to fully cure). The wipe-on is an oil based, cut 50/50 on the first two coats then about 75/25 on the last two coats. Very light sanding in between coats to remove dust and nibs. I then used 00 steel wool with some furniture wax to rub it out and then buff it to a nice smooth finish. 

Here are a couple photos of the finished product, the first one shows that under bevel on the front edge of the top.

Finished product:

Lessons Learned - What's Next?

As with anything, I like to learn something from a project, whether it is a technique or design element. On this project, I hand chopped my first mortises, which was fun, but a lot of work. I don't think I could have reliably done it with a machine so I was "forced" to learn this method. Second, if I re-think the design, I think I would curve the front apron on the base to look similar to the curve on the top; I think that would have been a nice design element and made the desk even more inviting; maybe next time.

My next project is going to be an outdoor dining table for a friend of mine who recently bought a house. This table will be made from white oak, which is very reliable for outdoor furniture. Check back in, or subscribe to the blog to get updates on this beast of a table!

Tuesday, April 12, 2016

Office Desk Build (Part 1)

Now that my new shop is in mostly working order, it is time to build something! The first "major" build is going to be an office desk for our house. The design called for something "a little different" which really just meant, not the usual straight legs. Because the area where the desk is going is not really large, and also not a primary working space, it does not need to be very big nor complicated. Of course, I've been given "artistic license" to make some modifications as I see fit, provided the are not too drastic; whatever that means. Basically, this desk will have legs that are slanted on an angle in the front and the back; 3.5 degrees to the back and 7 degrees to the front.

The Lumber - Milling

The desk will be made from all cherry, which I procured from my favorite store, Peach State Lumber. It calls for 4 legs, 4 aprons (2 side, front and back) and a top. There won't be any drawers so that this does not become a catch-all for random "junk". I usually get started with a chalk layout of my pieces, as I picked them in the store.

Because I am not using plans, and sort of making this up as I go, I thought I would start with the legs. I kind of came up with the 3.5 and 7 degree dimensions by using a piece of 1x4 pine material and a compass square to find an appealing angle. In the picture above, you can see that I marked a triangle for the legs so that I can try and keep them oriented as best as possible as I go through the process. Once I rough cut them, I will mark them with pencil on their ends in the same manner. Here they are milled to near final dimensions, which is 1.25" wide by 2.5" deep (thick) by just over 30" long.

Measuring and Layout

Once the legs were milled to dimension, I needed to determine an appealing length and layout for the two side aprons. Here, I simply have the milled apron piece clamped to the legs so I can come up with an appropriate length.

This length needs to take into consideration how deep the top of the desk will be and the front and back overhang of the top. Too big and there won't be a lot of room, too small and it could make it unstable. Once I determine the apron length, I can make a pencil mark to define the shoulder of the tenon that will be cut into the apron; I will be doing double mortise and tenon joints on these legs because the aprons are 5" wide and one long tenon would, in theory, not be as strong as splitting it up. 

Next Steps - Lessons Learned

The next step will be to cut the tenons into the two aprons. I will be cutting these by hand as I think it will be easier than trying to mess with multiple machine setups and potential mistakes. Once the tenons are cut, I will use those to mark for the mortises, which will be cut on a mortising machine; I "cheated" a little on how I did this so you'll have to see what I did.

I also wanted to close with a little lessons learned; I think it is important to impart things I figure out along the way, for those that may not have done this before. None of this is the "right way" per se, just how I did it. First, make sure you have a good compass square that can really lock in place. Second, as far as possible, make all layouts for that particular angle at the same time. For example, I measured all my 7 degree angles before moving on to my 3.5 degree measurements. If you don't do this, take the time to mark and cut a scrap piece that has these measurements on it so you can quickly get your measurements from it later if you need to. Lastly, similar to the measurements, make all angled cuts for the same setting at the same time. This keeps you from having to move your miter gauge back and forth and having errors, or worse, losing track of which cut is supposed to go where and making a mistake. 

So, next time it will be mortise and tenon cutting time and, hopefully, a dry fit of the two sides.


Monday, January 17, 2011

Shaker Table Completed!

Well, the Shaker table is now complete and ready for sale! As I mentioned in my previous post, I used 3 coats of a Tung Oil finish followed by thinned coats, about 1-2 lb cuts of shellac; I used about 3 coats on the main part of the table and 5 coats on the top. The shellac was rubbed out with 0000 steel wool and paste wax. I think the oil does a nice job of revealing the stripes in the tiger maple. I know a lot of people like to use a dye to do that, but I think oil works great, it's simple and more natural. As this is cherry, the piece will get darker over time and with exposure to sun. So, here it is!


Let me know what you think!

Be Safe!

Tuesday, January 11, 2011

Shaker Table - Home Stretch!

Well, I am in the home stretch of this project. The last thing I needed to do was build the drawer and put the drawer runners in. The drawer is made of maple with a Tiger Maple front. I really like the way the tiger maple compliments the cherry, especially as it darkens. So, here are a couple shots of the drawer, through dovetails in the back, and half blind dovetails in the front.
Here is a shot of the tiger maple drawer front. You can see the figure in the grain and this will be drawn out with the oil and shellac finish I am putting on it.

Well, that is all for now; next time I have pictures it should be all complete. The finish for this is really simple; I am using three coats of tung oil finish and then 3-5 coats of shellac and polished out.

Be Safe!

Friday, January 7, 2011

Shaker Table - Part 2

Wow! It has been a LONG time since my last update. I guess Christmas and New Years got in the way there somewhere. I hope everyone had a good Christmas and New Year break as I did.

Ok, so back to this table. Last time I left off I had milled the four leg blanks to size and was getting ready to mill the leg rails. Once I milled up the leg rails, I needed to lay out for the mortise and tenon joins. I probably do things a little different, but that's just the way I am; I cut my mortises before I do my tenons. I guess the reason I do it this way is because I have a mortising machine and the chisels are a defined dimension and I can cut the tenons to match this. Also, because the side and back rails are 5" wide, I will be using a haunched tenon in order to add strength to the joint. If I used just one big mortise and tenon, the legs would be very weak because of all the material that would be removed. So, after I laid out how I wanted the mortises to be, I drilled them out with the mortiser and cut the tenons to match.

After that, I was able to do a dry fit on the table.

If you notice, I have not cut the tapers on the legs yet; this is done after the mortises are cut so the legs are always flat will doing the mortises. It also serves as a bit of a reference when you do go to cut the tapers because you know to always taper the mortised side. Here, the legs were tapered on the bandsaw and cleaned up with hand planes.

Now the table frame is ready to be glued up. While that is being done, I can get the drawer runners cut and glued in; nothing special about these, just some pieces that will be glued to the sides and allow the drawer to set on and provide support from the bottom.

Next, it's time to turn my attention to the drawer itself, but that is for later.

Be Safe!

Saturday, December 11, 2010

Next Project - Will be for sale!!

So, as I wrap up the finish on the Book Nook, I am moving on to another project; I will post pictures of the finished Book Nook once the finish is all done.

This next project is going to be a Shaker inspired side table, very similar to the bedside tables I have already done, just different dimensions; also, this piece will be FOR SALE upon completion! I have not finalized a price yet so stay tuned. Anyways, this piece will be made out of cherry and curly maple. I am using some of the same cherry that I did for the Book Nook, procured from Peach State Lumber. The "plans" I am using call for 1 1/2" square legs (I put 'plans' in quotes because I am not really going off of one specific plan, but a combination of a few). So, for the legs I am going to use 8/4 lumber to give me that finished dimension. Also, I select a board wide enough that I can get all 4 legs from the same width of wood for grain continuity. Below is a picture of how I did that.
As you can see in this photo, the grain all lines up so you know it all came from the same board. How I keep them all lined up prior to cutting is by numbering them and putting witness marks on the end of the board.
Once all the leg pieces are rough cut, I use my Lee Valley low angle smoother to smooth all side of the legs to final dimensions. This smoother leaves a surface that is glass smooth and ready for finish; I love this thing! Take a look at these full length shavings.
Ok, enough for now. My next order of business will be to mill up the parts that will make up the sides and back. Then I will work on the mortise and tenon joints to hold it all together. So, until then...

Be Safe!

Friday, December 3, 2010

Book Nook - Part 2

So, last time I left off I had routed the dados to receive the shelves. My next order of business as to mill up the trip pieces that will also provide support for the shelves and provide the front lip on the shelf to keep the books from slipping off. Also, I had to drill holes to receive the cross braces that will keep the books from falling forward.

So, I milled up some 3/4"x2" pieces, routed a profile on them and also put a 3/8"x3/4" dado in the back of the trim pieces so that they will slip into the front of the shelves.
This is a shot that gives you an idea of the profile and the lip the trim puts on the shelf (my photography isn't too good)
Once that was done, I had to drill the holes to receive the dowels for the cross braces. To do this, I used the same process where I lay the sides back-to-back so that when I lay out the places for the holes they will be perfectly aligned.
Ok, once that was all done, I had to take some time and put a profile into the sides of the book nook so that they weren't just square and boring. So, after about 12 tries, here is what I came up with.
I'm pretty pleased with that look and I think once it is done will give it a nice profile/look.

Ok, once that was all done, I did a quick dry fit and then it was time to glue it up! Big milestone...

Let me just first say, this was the most frustrating glue up I have EVER done. Oh man, did I ever need an extra set of hands to do this. Anyways, I got it done and below are a couple shots of the sides, shelves and braces all glued up. NOTE: notices the top back piece is also in; I had to do this because I had to put dados into the back to receive the back; you can see that dado in the pictures above.


Now, I just have to let that set for a while to dry up and then I will come back and glue all the trim pieces on. Once that is done, it is the pains taking task of removing any glue squeeze out and final sanding and then it is "off to the finishing room". I can see the light at the end of the tunnel!

Be Safe!

Tuesday, November 30, 2010

New Project - Book Nook - Part 1

Alright, alright, time for a new project! I was asked to build a children's bookcase that would hold books with the covers facing outward instead of the traditional binding facing outward; kind of a book display really. I did a little research and found these are typically called a Book Nook. These are pretty interesting, and pose some unique challenges, because of the dimensions; typically they are only a foot deep, about three feet tall and about 4 feet wide. What got me was only being a foot deep; I felt that this would make for an unstable design. I did notice in my research that many of them had a way in which to fasten the top of the book nook to a wall for stability.

So, with all this in mind, I decided on the final dimensions and design. This one will be 12" deep, about 42" wide and about 36" tall. It will have 3 shelves with each shelf capable of holding about 4 books side by side and roughly 3 or 4 deep. I also decided that this piece will be made in cherry and the finish will be BLO and shellac, no stain.

My first order of business as was to make a trip to Peach State Lumber and get the cherry I would need for the project. I decided I wanted 8/4 cherry so I could resaw it for the sides, since I knew I would have to glue two pieces together. I literally had to go through the entire pallet to find the boards that would work for me, but sometimes you have to do that. So, here are the boards I picked up:
I did get more than I needed because I will be using the rest for another project once I'm done with this. My first order of business was to mill the lumber square so I could resaw it on the band saw. Some of this required the use of hand tools, which I don't mind.
Once that was done, they were resawn on the band saw and laid out for glue up. Here you can see the book matched pieces, ready for glue up. I always make some kind of witness mark on the boards so I know exactly how they should be put together.
Once I had both side panels glued up, it was now time for the tedious process of laying out for the 3 shelves. I wanted them to be equally spaced both vertically and horizontally. I did this by laying them back-to-back so that I could just transfer the lines from one to the other and know they were in perfect alignment. Here are the two side pieces laid back-to-back with the insides facing up.
Also note that I make sure to mark the grain direction; that is was the arrows are for. This just helps me keep everything flowing the same direction. Next, I had to do all the layout lines, which took a good while because I wanted to be exact and there were some design features that I had to take into account. After the layout was done, I used a router to rout out a 3/8" deep dado for each shelf and then used chisels to square up the dados.
So, my next order of business is to mill up the pieces that will be for the front and bottom trim. These trim pieces will serve multiple purposes. First, they will have a dado in them that will allow them to fit into the shelves so that will help to keep the shelves from sagging by adding support. Next, they will stick up from the front edge of the shelf about 1" which will provide a lip for the books to set into so they don't fall off the shelf and lastly, the will have a profile on them to add character. Once I have those trim pieces done, I will also begin to build the back of the shelves. That is all I've got for now....

Be Safe!