Showing posts with label dado. Show all posts

Friday, December 3, 2010

Book Nook - Part 2

So, last time I left off I had routed the dados to receive the shelves. My next order of business as to mill up the trip pieces that will also provide support for the shelves and provide the front lip on the shelf to keep the books from slipping off. Also, I had to drill holes to receive the cross braces that will keep the books from falling forward.

So, I milled up some 3/4"x2" pieces, routed a profile on them and also put a 3/8"x3/4" dado in the back of the trim pieces so that they will slip into the front of the shelves.
This is a shot that gives you an idea of the profile and the lip the trim puts on the shelf (my photography isn't too good)
Once that was done, I had to drill the holes to receive the dowels for the cross braces. To do this, I used the same process where I lay the sides back-to-back so that when I lay out the places for the holes they will be perfectly aligned.
Ok, once that was all done, I had to take some time and put a profile into the sides of the book nook so that they weren't just square and boring. So, after about 12 tries, here is what I came up with.
I'm pretty pleased with that look and I think once it is done will give it a nice profile/look.

Ok, once that was all done, I did a quick dry fit and then it was time to glue it up! Big milestone...

Let me just first say, this was the most frustrating glue up I have EVER done. Oh man, did I ever need an extra set of hands to do this. Anyways, I got it done and below are a couple shots of the sides, shelves and braces all glued up. NOTE: notices the top back piece is also in; I had to do this because I had to put dados into the back to receive the back; you can see that dado in the pictures above.


Now, I just have to let that set for a while to dry up and then I will come back and glue all the trim pieces on. Once that is done, it is the pains taking task of removing any glue squeeze out and final sanding and then it is "off to the finishing room". I can see the light at the end of the tunnel!

Be Safe!

Tuesday, November 30, 2010

New Project - Book Nook - Part 1

Alright, alright, time for a new project! I was asked to build a children's bookcase that would hold books with the covers facing outward instead of the traditional binding facing outward; kind of a book display really. I did a little research and found these are typically called a Book Nook. These are pretty interesting, and pose some unique challenges, because of the dimensions; typically they are only a foot deep, about three feet tall and about 4 feet wide. What got me was only being a foot deep; I felt that this would make for an unstable design. I did notice in my research that many of them had a way in which to fasten the top of the book nook to a wall for stability.

So, with all this in mind, I decided on the final dimensions and design. This one will be 12" deep, about 42" wide and about 36" tall. It will have 3 shelves with each shelf capable of holding about 4 books side by side and roughly 3 or 4 deep. I also decided that this piece will be made in cherry and the finish will be BLO and shellac, no stain.

My first order of business as was to make a trip to Peach State Lumber and get the cherry I would need for the project. I decided I wanted 8/4 cherry so I could resaw it for the sides, since I knew I would have to glue two pieces together. I literally had to go through the entire pallet to find the boards that would work for me, but sometimes you have to do that. So, here are the boards I picked up:
I did get more than I needed because I will be using the rest for another project once I'm done with this. My first order of business was to mill the lumber square so I could resaw it on the band saw. Some of this required the use of hand tools, which I don't mind.
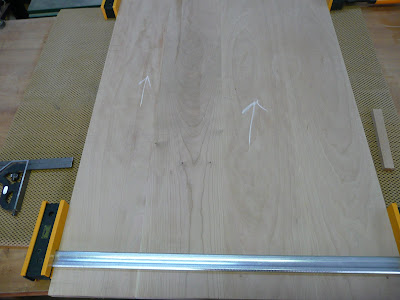
Once that was done, they were resawn on the band saw and laid out for glue up. Here you can see the book matched pieces, ready for glue up. I always make some kind of witness mark on the boards so I know exactly how they should be put together.
Once I had both side panels glued up, it was now time for the tedious process of laying out for the 3 shelves. I wanted them to be equally spaced both vertically and horizontally. I did this by laying them back-to-back so that I could just transfer the lines from one to the other and know they were in perfect alignment. Here are the two side pieces laid back-to-back with the insides facing up.
Also note that I make sure to mark the grain direction; that is was the arrows are for. This just helps me keep everything flowing the same direction. Next, I had to do all the layout lines, which took a good while because I wanted to be exact and there were some design features that I had to take into account. After the layout was done, I used a router to rout out a 3/8" deep dado for each shelf and then used chisels to square up the dados.
So, my next order of business is to mill up the pieces that will be for the front and bottom trim. These trim pieces will serve multiple purposes. First, they will have a dado in them that will allow them to fit into the shelves so that will help to keep the shelves from sagging by adding support. Next, they will stick up from the front edge of the shelf about 1" which will provide a lip for the books to set into so they don't fall off the shelf and lastly, the will have a profile on them to add character. Once I have those trim pieces done, I will also begin to build the back of the shelves. That is all I've got for now....

Be Safe!

Friday, January 29, 2010

Media Cabinet - Plugging along

It's been a while since I have given an update on progress. Mostly, the progress hasn't been anything too exciting, or exciting enough to write about, but I figured I should anyways. So last time I left off I had made the doors and and had begun to scrape all the glue lines for the top. I have since then finished all the scraping; I had to scrape the bottom platform and all the side pieces...basically anything that I had joined. Next I turned my attention to the two swing out doors. These are for holding games and DVD's. To keep things simple, and looking good, I decided to go with half-blind dovetails to joint the sides to the bottom (there is not top). So I set it all up in my Leigh jig, made a couple test cuts and knocked them out.
From MediaCabinet

I had a little tear out on the first one because I forgot to use a backer board. This joint is on the bottom anyways so it will never be seen.
From MediaCabinet


Next, I figured I would start on the top. It takes a while to glue the boards up so I figured now was a good time to do it because while the glue dries I can work on other items. So, the top is to be about 65" long by 22" deep. I started with a long 12/4 piece of wood. This I will resaw three times to get my three pieces need to make the top. I have an 8" jointer and this board was wider than that so I had to initially flatten it by hand. For those not familiar with doing this, a good way to get started is to use chalk and mark up your board.
From MediaCabinet

This allows you to know the areas that you have, and have not, planed. Then, you use something like a #4 and begin to work up and down the board at a pretty big angle, somewhere between 45 and 60 degrees.
From MediaCabinet

This is a shot of about half way though. You can see the center of the board still has chalk, this tells me that I have not yet gotten the whole thing flat. If you look at the part of the board closest to you, you can also see the plane marks and the angle of approach I am using. As you get it more and more flat, you begin to decrease the angle and then eventually switch to another plane to finish it off.
Here are the three, book matched, boards after being resawn and planed to thickness. By the way, resawing a 12/4 piece of wood 70" long is a real treat!
From MediaCabinet

It's not the greatest picture in the world, but I think you can get an idea for the triple book match. This is something that sets one piece of work apart from others so take note when looking at "antique" furniture and the quality of work.

Next, I needed to layout and begin routing the dado's for the vertical panels. I'm starting with the two outer most panels, these only come in just over half way as they are part of the swing out door assembly. I always turn into a nervous wreck when I have to do things like this because if you mess it up, all that wood and work are ruined. Anyways, I made the first two with no problem.
From MediaCabinet


So next I need to rout the dado's in the swing out doors that house the shelves for the storage. This will be two dado's on each side. Once I have those in, I will then glue up the swing out doors and use those to aid me in laying out where the next dado's go for the middle, full length, vertical panels. More on that later though!

Be safe!