Wednesday, March 18, 2009

Coffee Table....DONE!!

Well, I put the finishing touches on the coffee table yesterday so this project is officially DONE! Overall, this project did not take terribly long, considering I have a day job and all. After I did all the final sanding and everything, I wet sanded with 400 grit paper and some Boiled Linseed Oil (BLO). After I let that dry a bit, I then used Watco Danish Oil, Dark Walnut, and went over the whole piece, again wet sanding it in. I did two coats of that and let it dry for about a week. Then, I applied 3 coats of a satin wipe on polyurethane. After the third coat, I lightly sanded with 400 grit paper and applied two more coats. Lastly, I put a light coat of paste wax on it and buffed it out. Below are a couple pictures.
From Coffee Table

In this first picture you can see the legs from all angles as well as the double beed detail on the top.
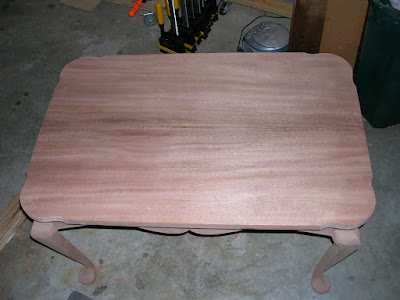
From Coffee Table

This pictures shows the crazy grain in the top; this was NO FUN to plane, but I just took my time and made very, very light passes. I really like the look of this particular piece of mahogany. You can also see the scalloped edges in this shot.

Overall, I really enjoyed this project. I tried several new things to test my skills; first time using mahogany, first cabriole leg, first shaped aprons, first scalloped top, first double beed. Even with all of these "new" things, it was one of the easiest projects I've ever done. I probably did my most thorough job of planning and thinking through each step with a focuse on the next step. I definately increased my abilities and concured the fear of trying new things in woodoworking, as well as better planning. Lot's to build off of as a result of this project!

Monday, March 2, 2009

Coffee Table Project - Topping it off

Ok, so I resawed the piece for the top, planed it down and glued it together. Planing this thing down was a real treat! This particular piece is going to be great as a top, but it has a lot of switch back grain pattern which is a nightmare to work with. I had to take very, very light passes and try to scew the board at an angle as it went through the planer to avoid major tearout. So far it has come out good.

Next, I wanted to do something with the corners of the table, I didn't want it to be just square or just round the corners so I went with what is called a clam shell corner. it just so happens that my dining room table is like this so I took a quarter inch piece of plywood and traced it out to make a template. I modified it just a little, traced it onto my table top and cut it out on the band saw and used my spindle sander to sand to the line. Here is a view of it roughed out.
From Coffee Table

You can see the pattern, especially in the upper right. You can also make out the book match effect a little with the dark grain pattern in the middle of the board. So, normally I would just round over the top of the edges and be done with it, but I really wanted to test my skills on this project so I decided to do a double bead. I had seen this somewhere else and really liked it. Because of the grain on the top, I didn't want to risk using a router and have it take a chunk out of the edges. So what I did was approach it in two steps. First, I use a rabbet bit in the router and routed a 1/8" groove, centered, around the edge of the board. Next, I took a piece of metal and made a scratch stock. This allows me to control the cut by adjusting the angle and pressure to make sure I'm not doing too much at one time. From there, it was just pure putting my back into it and taking my time. Here's a shot of the scratch stock and the edge I'm putting on the top.
From Coffee Table

Here you can really see the groove that I cut and the double bead I'm talking about; this is really turning out nice in my opinion and just adds another nice little touch. It was a lot easier to do than I though. Now I need to do some finish sanding and start thinking of how I want to finish it. Ideas/suggestions welcome on the finish!

Coffee Table Build Cont'd

lot's of progress since my last post. After I got the rails dry fit to the legs, I began to glue it all together. I started by gluing two sections together at a time. I used a strap clamp to pull the legs in just a little and then a clamp at the post to bring it all together.
From Coffee Table

Once this was done, I followed the same principle for gluing the whole thing together. One thing I did before I glued it together though was to cut a grove about a half inch from the top of the rails on the inside; this will be used for the buttons I made to attach the top to the bottom. I need to now focus some attention on the top. My first order of business is to resaw the board I have for the top in half to book match it.