
Be safe!
Showing posts with label Mahogany coffee table. Show all posts
Showing posts with label Mahogany coffee table. Show all posts
Wednesday, July 28, 2010
Coffee Table Done!
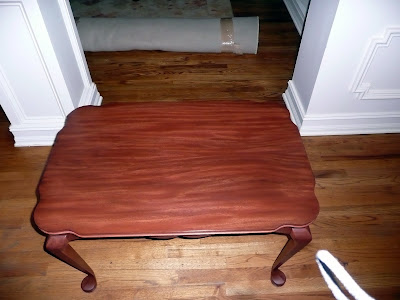
Wow, it has been forever since I have posted anything! I finally finished the coffee table I was working on. It took a lot longer this time because the top really gave me fits. The wood has some amazing figure/grain in it, but that is also what makes it so hard to work with. I ended up having to build the top three different times before I got it to come out right. Here are some pictures of the finished product.


Saturday, March 27, 2010
Coffee Table build
I've made some progress on the coffee table. I am glad I kept all my jigs and templates from the last time I made this table; it is saving me a lot of time. My next task was to mill all the rough pieces down to final dimension to get them ready. Here I am sawing the 12/4 pieces down to make the aprons, which are 3/4.
Here all the apron pieces are roughed out and now just need to be planed to thickness.
I also cut the leg blanks to size and planed them to final thickness, which is 2.75" square.
So, I will let those pieces sit overnight and then begin to cut the cabriole legs next time.
Be Safe!
 |
| From ChrisJanetCoffeeTable |
Here all the apron pieces are roughed out and now just need to be planed to thickness.
 |
| From ChrisJanetCoffeeTable |
I also cut the leg blanks to size and planed them to final thickness, which is 2.75" square.
 |
| From ChrisJanetCoffeeTable |
So, I will let those pieces sit overnight and then begin to cut the cabriole legs next time.
 |
| From ChrisJanetCoffeeTable |
Be Safe!
Monday, March 2, 2009
Coffee Table Project - Topping it off
Ok, so I resawed the piece for the top, planed it down and glued it together. Planing this thing down was a real treat! This particular piece is going to be great as a top, but it has a lot of switch back grain pattern which is a nightmare to work with. I had to take very, very light passes and try to scew the board at an angle as it went through the planer to avoid major tearout. So far it has come out good.
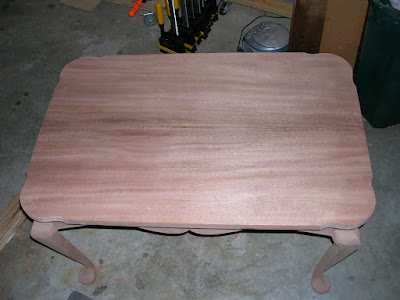
Next, I wanted to do something with the corners of the table, I didn't want it to be just square or just round the corners so I went with what is called a clam shell corner. it just so happens that my dining room table is like this so I took a quarter inch piece of plywood and traced it out to make a template. I modified it just a little, traced it onto my table top and cut it out on the band saw and used my spindle sander to sand to the line. Here is a view of it roughed out.
You can see the pattern, especially in the upper right. You can also make out the book match effect a little with the dark grain pattern in the middle of the board. So, normally I would just round over the top of the edges and be done with it, but I really wanted to test my skills on this project so I decided to do a double bead. I had seen this somewhere else and really liked it. Because of the grain on the top, I didn't want to risk using a router and have it take a chunk out of the edges. So what I did was approach it in two steps. First, I use a rabbet bit in the router and routed a 1/8" groove, centered, around the edge of the board. Next, I took a piece of metal and made a scratch stock. This allows me to control the cut by adjusting the angle and pressure to make sure I'm not doing too much at one time. From there, it was just pure putting my back into it and taking my time. Here's a shot of the scratch stock and the edge I'm putting on the top.
Here you can really see the groove that I cut and the double bead I'm talking about; this is really turning out nice in my opinion and just adds another nice little touch. It was a lot easier to do than I though. Now I need to do some finish sanding and start thinking of how I want to finish it. Ideas/suggestions welcome on the finish!
Next, I wanted to do something with the corners of the table, I didn't want it to be just square or just round the corners so I went with what is called a clam shell corner. it just so happens that my dining room table is like this so I took a quarter inch piece of plywood and traced it out to make a template. I modified it just a little, traced it onto my table top and cut it out on the band saw and used my spindle sander to sand to the line. Here is a view of it roughed out.
 |
| From Coffee Table |
You can see the pattern, especially in the upper right. You can also make out the book match effect a little with the dark grain pattern in the middle of the board. So, normally I would just round over the top of the edges and be done with it, but I really wanted to test my skills on this project so I decided to do a double bead. I had seen this somewhere else and really liked it. Because of the grain on the top, I didn't want to risk using a router and have it take a chunk out of the edges. So what I did was approach it in two steps. First, I use a rabbet bit in the router and routed a 1/8" groove, centered, around the edge of the board. Next, I took a piece of metal and made a scratch stock. This allows me to control the cut by adjusting the angle and pressure to make sure I'm not doing too much at one time. From there, it was just pure putting my back into it and taking my time. Here's a shot of the scratch stock and the edge I'm putting on the top.
 |
| From Coffee Table |
Here you can really see the groove that I cut and the double bead I'm talking about; this is really turning out nice in my opinion and just adds another nice little touch. It was a lot easier to do than I though. Now I need to do some finish sanding and start thinking of how I want to finish it. Ideas/suggestions welcome on the finish!
Subscribe to:
Posts (Atom)