Well, I've been pretty busy building some pens and have sold a few so that helps out. I recently bought a new flat panel LED TV so now I need to build a new stand for it. I want to build a stand that the TV will stand on, but that also has room to hold my receiver, cable box, Xbox, PS3 and DVD's/Games. So, one day I decided to browse through the Pottery Barn catalog and see what they had and found exactly what I was looking for:
http://www.potterybarn.com/products/hudson-large-media-console/?pkey=cmedia-stand-flat-screen-display
This design is exactly what I need; TV sits on top, there is room for all the accessories as well as media storage on the sides. I also like that you can close the whole thing up if you want, when not in use. This will be the first cabinet I've built that has pocket doors too so that should be interesting.
This piece is going to be made out of Walnut, which I haven't used since my first piece which was the blanket chest, so I'm looking forward to that. Since Christmas is just a few days away, and New Years just after that, I'm not exactly sure when I will get started, but I may buy the wood after Christmas so that it can acclimate in the shop and then I can get started right after the new year; should be a nice way to ring in the new year! So join me around that time frame for the design and build along. I'm always eager to learn so input is always welcome!
Merry Christmas and a Happy New Year to you and your family!
Be Safe!
Tuesday, December 22, 2009
Tuesday, November 10, 2009
Woodworking items now for sale!
Well, since I have been sidelined with my knee injury, I thought I would get into turning pens. I've had a lot of fun doing it so I've taken the next step and I have put some up for sale. I have opened a store front on Etsy.com. Right now I only have a few pens up there, but I'm going to be putting more up there so you can subscribe to my store as a feed. Later on, I am also going to build some small boxes and put them up there as well. Again, I'm just a hobbyist, but if you can make a little money here and there, why not. Etsy is nice because it is dedicated to handmade items and their costs are very reasonable. So, check out the store...feedback welcome!
www.vanvleetwoodworking.etsy.com
Be safe!
www.vanvleetwoodworking.etsy.com
Be safe!
Saturday, November 7, 2009
CA Finish for Pens - Part 2; An Observation
In one of my previous posts I commented on my success and failures of using a CA finish on some of my pens. I've been tinkering with it a bit more with some more success, but I've made a few observations about the success, or lack of success in some cases, I am having.
First, I've noticed that if you use more than, say, two coats of CA, the pen will have a plastic feel. This makes total sense because the CA is an acrylic of sorts so the more you add, the more "plastic" you get. The advantage to this is you get a rock hard finish that will last nearly forever.
Second, the wood makes a difference. I've tried using a few different types of woods; cherry, tiger maple, paduk and rosewood. For some reason, it seems to me that the harder woods such as cherry, paduk and rosewood seem to do better than a softer wood such as maple. I have had success with maple, but it just seems more finicky than the other woods.
Third, one thick coat goes a long way. How I have had good success is to use a good coat of BLO. I apply this by wet sanding with 1000 grit paper and wiping the access with a rag. Then, with the lathe off, I apply the CA to the pen while rotating the mandrel by hand and quickly rubbing back and forth. I go around, quickly, three or four times, then stop. Next, I let that sit for a while to harden and cure, then I come back and wet sand with BLO, but this time with 2000 grit paper. I then increase the speed and apply BLO to a rag and wipe the whole thing down and apply slight pressure to heat the BLO into the pen, if you will.
This method has given me the most success so far. The other thing I really like about it is you do get a good protective CA finish on the pen, but it does not feel like plastic and retains the warmth of the wood underneath. But, this is all one person's observations, I would love to hear your take and your method for finishing.
Be safe!
Monday, November 2, 2009
On the DL for a while
Well, a while back I had posted about blowing my knee out and tearing my ACL while playing basketball. I had ACL replacement surgery on Thursday, the 29th, so I am laid up for a while so no major woodworking for a while. Prior to the surgery and I had been on a pen making binge so once I am able to get up and about without much pain I will be back at that. I have a bar stool I can use while at the lathe and do some turning so that will help.
In the mean time, I have been working on my main website www.vanvleetwoodworking.com Right now, it is major lame and outdated! I am not happy with it at all so I am poking around the Internet and looking for some ideas on design and layout. I am using Microsoft Expression Studio to build it so I am learning that now as well. I hope to have something up soon, like this week. If others out there are using Expression, I would love some pointers and links to some resources out there to keep learning; I've found some good ones, but know people always have others they like.
Hope to be back up and woodworking soon! Be safe!
Monday, October 26, 2009
CA Pen Finish - mixed results
So I've been in a pen turning mode for a while; I'm having some fun with it, creating different designs on some slim line pens. I've been using a few different finishing techniques as well. One is Shellac/Wax called Shellawax Cream. It is super easy to use, just put some on a paper towel and apply while the lathe is spinning. It creates a nice finish, not super glossy and has a good feel. Next I tried a friction polish, which is a lacquer based finish, in a semi-gloss. This is really easy to use as well; just apply to a paper towel and apply to the piece as it's spinning. I like this finish as well, but I think I would like something with a bit more shine so I might try the high-gloss. Lastly, it brings me to the CA finish. I've tried this a couple different way. First, I tried it by simply applying it to the piece and wiping it on quickly, letting it set, apply another coat, etc up to 3-5 coats. Then I let it dry for a while and then wet sand it up to 2000 grit. This actually came out really nice, but was a bit fussy at first. Next, I read about using BLO with CA so I tried that. That is really easy to do, but I don't seem get the nice high-gloss finish that I do with just the CA build up. I'm applying BLO to the paper towel, and then CA over that. For some reason, it doesn't seem to build up as well. I would love some feedback on how others use the CA process; I've watched a couple videos online about it, and read through some articles, but I'm just not "getting it" so far, but I'm going to keep trying.
The pen below was finished with the BLO and CA combination the I outlined above, it is made from Tiger Maple. It came out well, but I would like a bit more gloss finish on it. I'm thinking I should have put a couple more coats on and then wet sand it. I will try that next.
The pen below was finished with the BLO and CA combination the I outlined above, it is made from Tiger Maple. It came out well, but I would like a bit more gloss finish on it. I'm thinking I should have put a couple more coats on and then wet sand it. I will try that next.
 |
| From Pen Making |
Monday, October 19, 2009
Pen Making - First attempts
In my other post I mentioned that I had bought the Penn State Industry pen making starter kit (found here) I've been having some fun with the kit; I never knew pen making was so easy. You can whip these suckers out in 15-20 minutes depending on what design you use. Well, I finally got around to taking some pictures of some that I've made.
These are in chronological order from left to right. They are all made from Rosewood except the one on the right, that Padauk. The middle two were made for a friend of mine and it is a pen and pencil set.
So now I'm in the process of making some more from other woods such as cherry, mahogany and tiger maple. I've also ordered different kits from some other sources, specifically www.woodturnerscatalog.com I ordered some roller ball kits from here. I'm looking to try different kits from different sources, but I've only found a few so if anyone has some recommendations, I'm all ears. Thanks for looking!
Be safe!
 |
| From Pen Making |
These are in chronological order from left to right. They are all made from Rosewood except the one on the right, that Padauk. The middle two were made for a friend of mine and it is a pen and pencil set.
So now I'm in the process of making some more from other woods such as cherry, mahogany and tiger maple. I've also ordered different kits from some other sources, specifically www.woodturnerscatalog.com I ordered some roller ball kits from here. I'm looking to try different kits from different sources, but I've only found a few so if anyone has some recommendations, I'm all ears. Thanks for looking!
Be safe!
Thursday, October 8, 2009
Out of commission for a while...
Well, with the changing of Summer into Fall, and the end of boating season, I usually resume my woodworking projects. I was getting geared up to FINALLY build some cabinets/storage under my workbench. I have the idea in my head and was thinking I would start on it this weekend. Well, I'm going to have to put that on the back burner for a few weeks at least; I was playing some basketball on Tuesday night and blew out my knee. The initial diagnosis is a torn acl and cartilage; MRI will tell the full extent of the damage, but it is looking like acl replacement surgery in the next couple of weeks. I'm a pretty active, and independent, person so being laid up in a full leg brace and crutches is killing me!
On another woodworking note, I was able to do some "new to me" woodworking recently; pen turning. This is one of the coolest things ever...I love it! I got a flier in the mail from Penn State Industries about their starter kit and figured "why not give it a try". So I ordered this kit: http://www.pennstateind.com/store/PK073SPECX.html
It arrived a few days later and is chock full of great stuff. I have only turned two pens, but I think they came out great. I will try and get some pictures up in the next couple of days. My wife took one of the, which is actually my favorite one, so when she gets back I'm going to snap a couple pictures and get them up. I will probably write a bit of a review about the kit as well so stay tuned for that.
So, even with the busted up knee, I'm hoping that I can still turn some pens and pencils, maybe get started on some Christmas presents this way. Happy woodworking and STAY SAFE!!
Wednesday, September 9, 2009
Woodworking Block....
So I'm in the middle of woodworking block...like writer's block, but for woodworking. I have not built anything since I made that mahogany coffee table. I don't know if it's a lack of creativity, or lack of motivation; I'm thinking motivation at this point. I have a few projects I would like to complete for the shop, but haven't started. I'm thinking I will start there, but it isn't anything "exciting". I've also thought about making some small boxes or something like that, but don't feel the "creative juices" flowing on that; no good box ideas.
Do, when you have a woodworking slump, what do you do to break the slump? What projects get you back in the woodworking groove? I could use some ideas!
Do, when you have a woodworking slump, what do you do to break the slump? What projects get you back in the woodworking groove? I could use some ideas!
Tuesday, September 8, 2009
Mail-In Carbide Blade Sharpening Service
Attention all you Highland Hardware fans! They now have a mail order sharpening service. NOTE: You cannot take your blades to the Atlanta store, they actually sharpen them in New Jersey. Check the link below for the full details and price list.
Mail-In Carbide Blade Sharpening Service
Mail-In Carbide Blade Sharpening Service
Friday, June 5, 2009
T-Chisel changes site
So just a couple days ago I posted about Tommy's new Grand Slam site; well today I get an update that the main T-Chisel.com site has now been changed as well. Tommy has moved to http://www.mlwwoodworking.com/
It's not completely done, but the forum is up at http://www.mlwwoodworking.com/forum so be sure to drop in and check that out.
It's not completely done, but the forum is up at http://www.mlwwoodworking.com/forum so be sure to drop in and check that out.
Wednesday, June 3, 2009
Grand Slam Tools!
I dropped over to T-Chisel's website today and stopped in the forum and noticed some talk about Grand Slam Tools; it appears to be a set of layout tools that Tommy has been making and selling either as a pack or individually. Check them out here: http://www.grandslamtools.com/
If you know Tommy, you know he is from the Boston area and is a huge Red Sox fan (too bad for him actually), but one look at these tools and you understand where his inspiration for tools came from. I really dig the Major League inspired logo! You've got to love the t-shirts as well "Major League Woodworking; way cool. Tommy, if you read this, you need a t-shirt that says "who's better than me?"!! That would be a huge seller for you!
So, check out Grand Slam Tools and then jump over to the forum and let him know what you think!
Wednesday, April 1, 2009
What comes next?
Well, with my latest project complete, and the shop all cleaned up...sort of, I'm trying to decide what to do next. Of course my wife has a few ideas; she always does. I'm thinking that a couple things that I really need to build are some shop cabinets. I really need some storage under my bench for hand tools, sandpaper, etc. Something basic and functional, nothing fancy. I'm thinking I may do something similar to what Marc Spagnuolo, aka The Wood Whisperer, did here: http://thewoodwhisperer.com/episode-19-assembly-table-stand/ Although I may reverse this a bit and do two sets of drawers and open cabinets/doors in the middle. Below is a shot of my bench as it currently is
You can see some drawers just laying there; those are from the drawer "system" I had before which was crappy, very crappy. So, I think I'm going to take some measurements, watch Marc's video a couple more times and start to build me some storage ;)
 |
| From ShopPics |
You can see some drawers just laying there; those are from the drawer "system" I had before which was crappy, very crappy. So, I think I'm going to take some measurements, watch Marc's video a couple more times and start to build me some storage ;)
Wednesday, March 18, 2009
Coffee Table....DONE!!
Well, I put the finishing touches on the coffee table yesterday so this project is officially DONE! Overall, this project did not take terribly long, considering I have a day job and all. After I did all the final sanding and everything, I wet sanded with 400 grit paper and some Boiled Linseed Oil (BLO). After I let that dry a bit, I then used Watco Danish Oil, Dark Walnut, and went over the whole piece, again wet sanding it in. I did two coats of that and let it dry for about a week. Then, I applied 3 coats of a satin wipe on polyurethane. After the third coat, I lightly sanded with 400 grit paper and applied two more coats. Lastly, I put a light coat of paste wax on it and buffed it out. Below are a couple pictures.
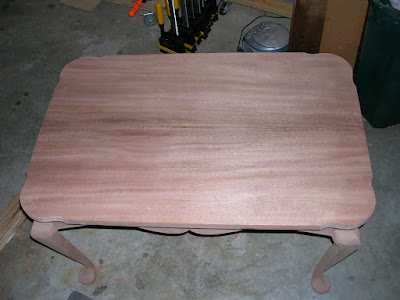
In this first picture you can see the legs from all angles as well as the double beed detail on the top.
This pictures shows the crazy grain in the top; this was NO FUN to plane, but I just took my time and made very, very light passes. I really like the look of this particular piece of mahogany. You can also see the scalloped edges in this shot.
Overall, I really enjoyed this project. I tried several new things to test my skills; first time using mahogany, first cabriole leg, first shaped aprons, first scalloped top, first double beed. Even with all of these "new" things, it was one of the easiest projects I've ever done. I probably did my most thorough job of planning and thinking through each step with a focuse on the next step. I definately increased my abilities and concured the fear of trying new things in woodoworking, as well as better planning. Lot's to build off of as a result of this project!
 |
| From Coffee Table |
In this first picture you can see the legs from all angles as well as the double beed detail on the top.
 |
| From Coffee Table |
This pictures shows the crazy grain in the top; this was NO FUN to plane, but I just took my time and made very, very light passes. I really like the look of this particular piece of mahogany. You can also see the scalloped edges in this shot.
Overall, I really enjoyed this project. I tried several new things to test my skills; first time using mahogany, first cabriole leg, first shaped aprons, first scalloped top, first double beed. Even with all of these "new" things, it was one of the easiest projects I've ever done. I probably did my most thorough job of planning and thinking through each step with a focuse on the next step. I definately increased my abilities and concured the fear of trying new things in woodoworking, as well as better planning. Lot's to build off of as a result of this project!
Monday, March 2, 2009
Coffee Table Project - Topping it off
Ok, so I resawed the piece for the top, planed it down and glued it together. Planing this thing down was a real treat! This particular piece is going to be great as a top, but it has a lot of switch back grain pattern which is a nightmare to work with. I had to take very, very light passes and try to scew the board at an angle as it went through the planer to avoid major tearout. So far it has come out good.
Next, I wanted to do something with the corners of the table, I didn't want it to be just square or just round the corners so I went with what is called a clam shell corner. it just so happens that my dining room table is like this so I took a quarter inch piece of plywood and traced it out to make a template. I modified it just a little, traced it onto my table top and cut it out on the band saw and used my spindle sander to sand to the line. Here is a view of it roughed out.
You can see the pattern, especially in the upper right. You can also make out the book match effect a little with the dark grain pattern in the middle of the board. So, normally I would just round over the top of the edges and be done with it, but I really wanted to test my skills on this project so I decided to do a double bead. I had seen this somewhere else and really liked it. Because of the grain on the top, I didn't want to risk using a router and have it take a chunk out of the edges. So what I did was approach it in two steps. First, I use a rabbet bit in the router and routed a 1/8" groove, centered, around the edge of the board. Next, I took a piece of metal and made a scratch stock. This allows me to control the cut by adjusting the angle and pressure to make sure I'm not doing too much at one time. From there, it was just pure putting my back into it and taking my time. Here's a shot of the scratch stock and the edge I'm putting on the top.
Here you can really see the groove that I cut and the double bead I'm talking about; this is really turning out nice in my opinion and just adds another nice little touch. It was a lot easier to do than I though. Now I need to do some finish sanding and start thinking of how I want to finish it. Ideas/suggestions welcome on the finish!
Next, I wanted to do something with the corners of the table, I didn't want it to be just square or just round the corners so I went with what is called a clam shell corner. it just so happens that my dining room table is like this so I took a quarter inch piece of plywood and traced it out to make a template. I modified it just a little, traced it onto my table top and cut it out on the band saw and used my spindle sander to sand to the line. Here is a view of it roughed out.
 |
| From Coffee Table |
You can see the pattern, especially in the upper right. You can also make out the book match effect a little with the dark grain pattern in the middle of the board. So, normally I would just round over the top of the edges and be done with it, but I really wanted to test my skills on this project so I decided to do a double bead. I had seen this somewhere else and really liked it. Because of the grain on the top, I didn't want to risk using a router and have it take a chunk out of the edges. So what I did was approach it in two steps. First, I use a rabbet bit in the router and routed a 1/8" groove, centered, around the edge of the board. Next, I took a piece of metal and made a scratch stock. This allows me to control the cut by adjusting the angle and pressure to make sure I'm not doing too much at one time. From there, it was just pure putting my back into it and taking my time. Here's a shot of the scratch stock and the edge I'm putting on the top.
 |
| From Coffee Table |
Here you can really see the groove that I cut and the double bead I'm talking about; this is really turning out nice in my opinion and just adds another nice little touch. It was a lot easier to do than I though. Now I need to do some finish sanding and start thinking of how I want to finish it. Ideas/suggestions welcome on the finish!
Coffee Table Build Cont'd
lot's of progress since my last post. After I got the rails dry fit to the legs, I began to glue it all together. I started by gluing two sections together at a time. I used a strap clamp to pull the legs in just a little and then a clamp at the post to bring it all together.
Once this was done, I followed the same principle for gluing the whole thing together. One thing I did before I glued it together though was to cut a grove about a half inch from the top of the rails on the inside; this will be used for the buttons I made to attach the top to the bottom. I need to now focus some attention on the top. My first order of business is to resaw the board I have for the top in half to book match it.
 |
| From Coffee Table |
Once this was done, I followed the same principle for gluing the whole thing together. One thing I did before I glued it together though was to cut a grove about a half inch from the top of the rails on the inside; this will be used for the buttons I made to attach the top to the bottom. I need to now focus some attention on the top. My first order of business is to resaw the board I have for the top in half to book match it.
Tuesday, February 17, 2009
Coffee Table Project - Cont'd
I've managed to make a lot of progress on this coffee table project over the last weekend. Once I got through the design and shaping of the legs, I was pretty straight forward. What I had to do next was mill and cut the rails to their rough size. Once that was done, I used the router table to cut the tenons to match the mortises in the legs. I just used a 3/4" bit set to a 1/4" height; I only cut one side of the tenon, the front, since the back will be be visible and this allows me to use a larger tenon than normal. At this point, the tenon is really just a rabbet along the front side, I simply take each tenon and lay it next to the mortise to mark the points that I need to cut off.
Once I had all the tenons cut and fit, I put the whole thing together for a dry fit.
I still have some finish sanding to do, as well as round all the edges on rails, but that should not take long. I am still trying to decide if I want to add a bead detail to the rails and legs or not; I cannot decide.
 |
| From Coffee Table |
Once I had all the tenons cut and fit, I put the whole thing together for a dry fit.
 |
| From Coffee Table |
I still have some finish sanding to do, as well as round all the edges on rails, but that should not take long. I am still trying to decide if I want to add a bead detail to the rails and legs or not; I cannot decide.
Wednesday, February 11, 2009
Coffee Table - Continued - Cabriole Legs
Ok, so in my post a while back, I created a second blank and decided on a template that I would use for production. So I went to work milling out my leg stock from 12/4 mahogany (that's why it's take me so long to post). Once I had everything dimensioned, I then traced the profile and went to cutting on the bandsaw just like before. Here are all the legs roughed out.
The next thing I needed to do before cutting the posts or rounding the feet on the lathe was to cut the mortises for the table rails, so here is a shot of those all done. My Delta Mortiser made quick work of it.
I'm going to be spending my next bit on forming the feet and shaping the legs, so that will take some time to do them all. I would also like to get my rails all cut and dimensioned; that should not take as long.
 |
| From Coffee Table |
The next thing I needed to do before cutting the posts or rounding the feet on the lathe was to cut the mortises for the table rails, so here is a shot of those all done. My Delta Mortiser made quick work of it.
 |
| From Coffee Table |
I'm going to be spending my next bit on forming the feet and shaping the legs, so that will take some time to do them all. I would also like to get my rails all cut and dimensioned; that should not take as long.
Saturday, January 31, 2009
Grizzly T10010 Wet Grinder Review - Follow Up
A while back, I posted an initial review of the Grizzly T10010 Wet Grinder; you can read the review here. Well, after having used the machine for a while, I thought I would post a follow up and give some more thoughts. First, I still love this machine for sharpening and honing; it is SUPER fast and easy. Second, you will need some "3rd party" accessories. I've read that the best, most economical setup for this machine, as compared to a Tormek, is to buy this machine, but use the Tormek accessories since they will fit. I have to say that I TOTALLY agree! Out of the box, I was fighting the Grizzly straight edge jig that comes with the tool; it's just not very good. So, the first thing I bought was the Tormek Square Edge Jig from Highland Hardware. That was a huge impovement, but I still wasn't getting a completely square edge and had the feeling that my wheel was not completely trued up. So, my next purchase, from Highland Hardware, was Tormek Truing and Dressing Kit. This was perfect! I found that my wheel was about a 32nd of an inch off from end to end, but also was not perfectly round. So, after a couple of passes with the truing tool, and I had a nice level, perfectly round, surface. I then went to town on my hand plane blades and got them nice and flat for a change; so much better.
So, bottom line is, if you don't want to fork out the money for the Tormek system, can recommend the Grizzly T10010 Wet Grinder, but I would save some money to also buy the Tormek accessories; it makes a big difference!
So, bottom line is, if you don't want to fork out the money for the Tormek system, can recommend the Grizzly T10010 Wet Grinder, but I would save some money to also buy the Tormek accessories; it makes a big difference!
Monday, January 26, 2009
Cabriole Legs - Take Two
Ok, so I was not really pleased with my first cabriole leg design, so I decided to have another go at it. Using the template from my previous post I prepared another pine blank from a couple 2x4".
After it was dry I took it down to the final dimensions of 20" long by 2.75" square. I then traced the pattern onto the two adjacent sides.
Then it was over to the bandsaw to cut it out. I made the first cut, saving the piece and taped it back on to provide support while cutting the second piece; simple blue tape works fine.
Finally, I had my ruffed out leg. You will notice in the picture below that the post is still the 2.75" square blank size; this is so I can put it on the lathe to turn the foot.
Before I turn the foot though, I need to relieve some material on the heel so I will not hit it while on the lathe. Here I have marked out the area I need to relieve; I will do that with a spokeshave.
Now to the lathe to turn the foot. All I want to do here is round out the bottom of the foot and define the pad. You can see in the picture below that I have drawn a line to where I want the pad to be, it's a little big on this one and will be refined on the final version.
Finally, after some turning and some work with a combination of the spokeshave and rasp, I have a more "finished" product. Also note that after I was done with turning the foot that I cut the posts back on the bandsaw.
I posted this over on T-Chisel's forum and received some good feedback about rounding the edges a little more and making it with a little more "sweep" instead of being so straight so I need to look into that.
 |
| From Coffee Table |
After it was dry I took it down to the final dimensions of 20" long by 2.75" square. I then traced the pattern onto the two adjacent sides.
 |
| From Coffee Table |
 |
| From Coffee Table |
Then it was over to the bandsaw to cut it out. I made the first cut, saving the piece and taped it back on to provide support while cutting the second piece; simple blue tape works fine.
 |
| From Coffee Table |
Finally, I had my ruffed out leg. You will notice in the picture below that the post is still the 2.75" square blank size; this is so I can put it on the lathe to turn the foot.
 |
| From Coffee Table |
Before I turn the foot though, I need to relieve some material on the heel so I will not hit it while on the lathe. Here I have marked out the area I need to relieve; I will do that with a spokeshave.
 |
| From Coffee Table |
Now to the lathe to turn the foot. All I want to do here is round out the bottom of the foot and define the pad. You can see in the picture below that I have drawn a line to where I want the pad to be, it's a little big on this one and will be refined on the final version.
 |
| From Coffee Table |
Finally, after some turning and some work with a combination of the spokeshave and rasp, I have a more "finished" product. Also note that after I was done with turning the foot that I cut the posts back on the bandsaw.
 |
| From Coffee Table |
 |
| From Coffee Table |
I posted this over on T-Chisel's forum and received some good feedback about rounding the edges a little more and making it with a little more "sweep" instead of being so straight so I need to look into that.
Friday, January 23, 2009
New Project - Coffe Table
Time for a new project! This time around I'm going to be building a coffee table similar to the one pictured below. This is a photograph of one in a magazine.
Mine will not have the curved sides like this one, but straight sides. I will have the curve in the sides though so it's not so boxy. Also, the legs will not have that dramatic of a curve in them. This project is going to be several firsts for me. First, I've not done cabriole legs before. Second, the corners are scalloped and I've never done that before. Lastly, I will be using mahogany for the wood, I've not used it before so I'm looking forward to that.
My first order of business was to practice making the cabriole legs and finalize the design. I decided to practice on a couple 2x4 boards glued together. As usual, I didn't do a good job of documenting my procedures, but I will on the next test run. You can find a really good video tutorial on Charles Neil's website here: http://www.antiquesbuiltdaily.com/tips.htm I followed this basic procedure for my first attempt. Even before that, I had to go to Highland Hardware and get myself a smaller blade for my bandsaw. Once I had that, I was ready to begin. So following Charles's basic principles I created a template out of 1/4" plywood. The table is going to be 21" tall, with a 1" thick top so the legs need to be 20" tall. Also, I decided on 2 1/2" thickness for the leg blanks. Armed with that, I created the template, traced it to the legs and cut it out on the bandsaw.
I also used the lathe to round the foot and create the pad, that was pretty fun. I need a spokeshave to form the heel so I had to order one, can't believe I don't have one. I also need it to help clean up the marks from the bandsaw.
So, this is my first attempt, not too bad, but the design needs some work. First, the foot is way too fat. I can fix that easy enough by taking it down more on the lathe. Second, there is not enough curve in the leg; it looks a little too straight. Lastly, the post is too tall. I want the aprons of the table to integrate with the curve of the leg, like in the picture above. So, armed with that, I went to work to create a new template. In this new template the first thing I did was draw a line for my final post length and based everything off of that. Here is a shot of the new template.
This looks a little better, but the more I look at the picture I think i can make some improvements. I think I may move the curve behind the knee up a little and make it a little more dramatic. I do like the knee and the transition into the foot. The ankle may be a bit too thin, but this won't carry much weight so it may be alright. Also, I may need to push the foot and pad back about a half inch or more.
 |
| From Coffee Table |
Mine will not have the curved sides like this one, but straight sides. I will have the curve in the sides though so it's not so boxy. Also, the legs will not have that dramatic of a curve in them. This project is going to be several firsts for me. First, I've not done cabriole legs before. Second, the corners are scalloped and I've never done that before. Lastly, I will be using mahogany for the wood, I've not used it before so I'm looking forward to that.
My first order of business was to practice making the cabriole legs and finalize the design. I decided to practice on a couple 2x4 boards glued together. As usual, I didn't do a good job of documenting my procedures, but I will on the next test run. You can find a really good video tutorial on Charles Neil's website here: http://www.antiquesbuiltdaily.com/tips.htm I followed this basic procedure for my first attempt. Even before that, I had to go to Highland Hardware and get myself a smaller blade for my bandsaw. Once I had that, I was ready to begin. So following Charles's basic principles I created a template out of 1/4" plywood. The table is going to be 21" tall, with a 1" thick top so the legs need to be 20" tall. Also, I decided on 2 1/2" thickness for the leg blanks. Armed with that, I created the template, traced it to the legs and cut it out on the bandsaw.
 |
| From Coffee Table |
I also used the lathe to round the foot and create the pad, that was pretty fun. I need a spokeshave to form the heel so I had to order one, can't believe I don't have one. I also need it to help clean up the marks from the bandsaw.
So, this is my first attempt, not too bad, but the design needs some work. First, the foot is way too fat. I can fix that easy enough by taking it down more on the lathe. Second, there is not enough curve in the leg; it looks a little too straight. Lastly, the post is too tall. I want the aprons of the table to integrate with the curve of the leg, like in the picture above. So, armed with that, I went to work to create a new template. In this new template the first thing I did was draw a line for my final post length and based everything off of that. Here is a shot of the new template.
 |
| From Coffee Table |
This looks a little better, but the more I look at the picture I think i can make some improvements. I think I may move the curve behind the knee up a little and make it a little more dramatic. I do like the knee and the transition into the foot. The ankle may be a bit too thin, but this won't carry much weight so it may be alright. Also, I may need to push the foot and pad back about a half inch or more.
Wednesday, January 21, 2009
Workshop Reorganization
Well, I've decided to use the really cold weather here in the South to reorganize my shop. I'm working from a 2 car garage that measures about 21'x21'. My shop always seems to be a work in progress anyways, always changing and rearranging. I don't make any one particular type of furniture so I can't exactly set it up for, say, cabinet making, or chair making, etc. I'm trying to take the best advantage of my space, while keeping a good portion of floor space available. I also try and keep everything mobile. Here are a couple pictures of what my shop used to look like.
It has changed a lot since that picture, but the layout is very similar; table saw on the side of the shop, butted against the wall, band saw in between the garage doors, work bench behind the table saw, dust collector tucked in the corner with PVC ducting runs and then other items such as planer, miter saw, sander, etc on mobile bases. Since this time I have added a few things such as a clamp rack, 8" Grizzly jointer, Grizzly lathe, wood rack and some other odds and ends.
So, since that time I've tried to utilize more space. One thing that I decided upon before starting this is that I am going to start breaking down sheet goods in another part of the shop; trying to rip a full sheet of plywood by myself is difficult, dangerous and a pain. I've decided that when I do use sheet goods, I'm going to break them down on saw horses with a long straight edge and circular saw, then over to the table saw. So, with that, this is my new layout. I'm going to run with this for a while and see how it works out. In this first shot, this is the view from the door from the house into the garage; along this wall are my Ridgid planer, 6" Grizzly jointer, Delta mortiser and Craftsman drill press. I also have my router cabinet at the far end. My Grizzly band saw is in the same place in between the doors.
The next shot continues to the right and shows my bench now tucked directly up to the tablesaw, and my table saw in the middle of the garage; I really like this layout. You can see my Harbor Frieght dust collector, my air compressor is tucke in that back corner, and my Grizzly 8" jointer. Also, you can see part of my lumber rack on that wall; I don't keep a lot of lumber around so these racks work great.
This last picture shows the rest of the shop, this is from one of the garage doors looking into the shop. Here you can my plywood storage on the left (where my DC used to be), then my new Grizzly lathe, my Ridgid spindle sander, clamp rack, miter saw and small power tool storage under that.
All in all I like this layout so far. I still have some random things to do like clear some more clutter out and re work the small extension table on my table say; I need it to extend the entire width of the back of the saw and right side table, right now there is a gap and this would give me more work space. Also, with this layout I basically have one garage door wide open so I can bring in lumber there, put it on the rack (right by the jointer) and prep it. Also, for sheet goods, I have enough room to layout some saw horses and break down the sheets and then move right to the table saw for the rest of the work. I do need to do a little work with the dust collection. Right now I don't have a good way to get a dedicated pipe to the 8" jointer without running it across the floor right where I would bring lumber in. I may by a long piece of flex hose and use that so I can unhook it whenever it's not in use.
 |
| From ShopPics |
 |
| From ShopPics |
It has changed a lot since that picture, but the layout is very similar; table saw on the side of the shop, butted against the wall, band saw in between the garage doors, work bench behind the table saw, dust collector tucked in the corner with PVC ducting runs and then other items such as planer, miter saw, sander, etc on mobile bases. Since this time I have added a few things such as a clamp rack, 8" Grizzly jointer, Grizzly lathe, wood rack and some other odds and ends.
So, since that time I've tried to utilize more space. One thing that I decided upon before starting this is that I am going to start breaking down sheet goods in another part of the shop; trying to rip a full sheet of plywood by myself is difficult, dangerous and a pain. I've decided that when I do use sheet goods, I'm going to break them down on saw horses with a long straight edge and circular saw, then over to the table saw. So, with that, this is my new layout. I'm going to run with this for a while and see how it works out. In this first shot, this is the view from the door from the house into the garage; along this wall are my Ridgid planer, 6" Grizzly jointer, Delta mortiser and Craftsman drill press. I also have my router cabinet at the far end. My Grizzly band saw is in the same place in between the doors.
 |
| From ShopPics |
The next shot continues to the right and shows my bench now tucked directly up to the tablesaw, and my table saw in the middle of the garage; I really like this layout. You can see my Harbor Frieght dust collector, my air compressor is tucke in that back corner, and my Grizzly 8" jointer. Also, you can see part of my lumber rack on that wall; I don't keep a lot of lumber around so these racks work great.
|
| From ShopPics |
This last picture shows the rest of the shop, this is from one of the garage doors looking into the shop. Here you can my plywood storage on the left (where my DC used to be), then my new Grizzly lathe, my Ridgid spindle sander, clamp rack, miter saw and small power tool storage under that.
 |
| From ShopPics |
All in all I like this layout so far. I still have some random things to do like clear some more clutter out and re work the small extension table on my table say; I need it to extend the entire width of the back of the saw and right side table, right now there is a gap and this would give me more work space. Also, with this layout I basically have one garage door wide open so I can bring in lumber there, put it on the rack (right by the jointer) and prep it. Also, for sheet goods, I have enough room to layout some saw horses and break down the sheets and then move right to the table saw for the rest of the work. I do need to do a little work with the dust collection. Right now I don't have a good way to get a dedicated pipe to the 8" jointer without running it across the floor right where I would bring lumber in. I may by a long piece of flex hose and use that so I can unhook it whenever it's not in use.
Tuesday, January 13, 2009
Face Frame with biscuits tip
So, while I was building an E-desk (more on this later) I made a sort of rookie mistake with face frames and biscuits. I guess it's not really a rookie mistake, I just was not paying attention and thinking of things before I was doing them. Anyways, I wanted to use face frame biscuits to attach the rails to the stiles; for some reason I think pocket screws, although great, or just too much for this - I might re-think that. Anyways, in this first picture you can see I've laid out the lines for where I want biscuits to go; I like to put my two stiles together and lay out the lines together to avoid errors while transferring lines. You can also see in this picture that I've cut the biscuits too, but I will show you what I did wrong.
Ok, it may be a bit hard to see, but this is how I laid the pieces out when I cut them with the biscuit jointer; can you see what I did wrong? Basically, I cut them from the same side, not opposite sides. What I mean by this is, I cut them out as I laid them out; what I needed to do was to flip one of the stiles end for end like in this picture.
If you can see in this one, my slots are now offset. Why is this the right way? Unless you have your jointer set to cut perfectly in the center of the board, you will, if you cut from the same reference side on both pieces, end up with an offset of your rail to stile however much your bit is off of center. See picture:
This maybe isn't even a 1/16th of an inch off, but it's off and not easily fixed without causing other problems.
What you need to do, if you are using biscuits, is to mark the outter face on all your rails and stiles. This will help you understand to what reference point you need to put the fence of your biscuit jointer. In my example here, becuase I was cutting them as I laid them out, I was then putting the biscuit jointer fence on the face of one stile, then on the BACK of the other stile, causeing the offset. If I would have marked the face on both of them, and cut from that as a reference, then I would have been fine. Make sense? So, mark all of the faces of your rails and stiles and use that as the reference point for cutting all of your slots. I eventually got it figured out by doing another piece and got it attached.
Happy and safe woodworking!
 |
| From E-Workbench |
Ok, it may be a bit hard to see, but this is how I laid the pieces out when I cut them with the biscuit jointer; can you see what I did wrong? Basically, I cut them from the same side, not opposite sides. What I mean by this is, I cut them out as I laid them out; what I needed to do was to flip one of the stiles end for end like in this picture.
 |
| From E-Workbench |
If you can see in this one, my slots are now offset. Why is this the right way? Unless you have your jointer set to cut perfectly in the center of the board, you will, if you cut from the same reference side on both pieces, end up with an offset of your rail to stile however much your bit is off of center. See picture:
 |
| From E-Workbench |
This maybe isn't even a 1/16th of an inch off, but it's off and not easily fixed without causing other problems.
What you need to do, if you are using biscuits, is to mark the outter face on all your rails and stiles. This will help you understand to what reference point you need to put the fence of your biscuit jointer. In my example here, becuase I was cutting them as I laid them out, I was then putting the biscuit jointer fence on the face of one stile, then on the BACK of the other stile, causeing the offset. If I would have marked the face on both of them, and cut from that as a reference, then I would have been fine. Make sense? So, mark all of the faces of your rails and stiles and use that as the reference point for cutting all of your slots. I eventually got it figured out by doing another piece and got it attached.
 |
| From E-Workbench |
Happy and safe woodworking!
Wednesday, January 7, 2009
Bedside Tables - Cherry
After I completed my pencil post bed, I needed to make a set of matching tables to go with it. I based this off of a New Yankee design that I really liked. The main table is made from cherry, but has a tiger maple drawer. I really like the contrast of cherry and maple, and tiger maple is probably my most favorite wood; I just love the way it looks.
I don't have any pictures of making the main table part (I need to get better about that!), but I do have several of the making of the top and then the finish. The plans called for a 1" thick top, so the first thing to do was cut some rough 5/4 stock to about an inch oversize. Here you can see 3 of the 4 pieces needed for this top.
Next was to face joint the boards to get one side flat.
Once I have one side flat, I run each piece through the planer to get down to the final 1" thickness.
After the boards were planed to thickness, I started to see how I wanted them oriented. I did this before I planed them, but sometimes after planing, things can change a little. This is a rough idea of what I came up with; subject to change without notice:
Then it was back to the jointer to joint the endges to get them ready for glue up.
Here they are glued up. If you look closely, you can see I change the orientation once again.
After all the glue was cleaned up it was time to cut to size, final sand and then begin the finish process. I've talked about my finish for cherry before, but again what I do is start with a heavy coat of BLO. Here is one top coated in BLO.
Now, after a few minutes, but before it dries, I will start adding the Watco Walnut colored Danish Oil. Here are two tops side by side after a few coats. You can notice the difference in how the color changes based on how the light hits it; the one the right looks much lighter, but it's the same. That really messed with me while I was working on it.
As for the rest of the table, it gets the same finish except for the tiger maple. All I did for that was put on several coats of BLO. Once they are all dried, I wipe on 3-5 coats of a satin poly. Here is one of the bases with the drawer in it.
What I really like about the finish, eventhough it is tricky, is that you can still keep the cherry grain that everyone loves. If you look at the legs on this table, you can still see the crazy grain pattern that it has. I have noticed that over time, this does not change but actually gets more enhanced and deeper.
I don't have any pictures of making the main table part (I need to get better about that!), but I do have several of the making of the top and then the finish. The plans called for a 1" thick top, so the first thing to do was cut some rough 5/4 stock to about an inch oversize. Here you can see 3 of the 4 pieces needed for this top.
 |
| From Cherry Side Tables |
Next was to face joint the boards to get one side flat.
 |
| From Cherry Side Tables |
Once I have one side flat, I run each piece through the planer to get down to the final 1" thickness.
 |
| From Cherry Side Tables |
After the boards were planed to thickness, I started to see how I wanted them oriented. I did this before I planed them, but sometimes after planing, things can change a little. This is a rough idea of what I came up with; subject to change without notice:
 |
| From Cherry Side Tables |
Then it was back to the jointer to joint the endges to get them ready for glue up.
 |
| From Cherry Side Tables |
Here they are glued up. If you look closely, you can see I change the orientation once again.
 |
| From Cherry Side Tables |
After all the glue was cleaned up it was time to cut to size, final sand and then begin the finish process. I've talked about my finish for cherry before, but again what I do is start with a heavy coat of BLO. Here is one top coated in BLO.
 |
| From Cherry Side Tables |
Now, after a few minutes, but before it dries, I will start adding the Watco Walnut colored Danish Oil. Here are two tops side by side after a few coats. You can notice the difference in how the color changes based on how the light hits it; the one the right looks much lighter, but it's the same. That really messed with me while I was working on it.
 |
| From Cherry Side Tables |
As for the rest of the table, it gets the same finish except for the tiger maple. All I did for that was put on several coats of BLO. Once they are all dried, I wipe on 3-5 coats of a satin poly. Here is one of the bases with the drawer in it.
 |
| From Cherry Side Tables |
What I really like about the finish, eventhough it is tricky, is that you can still keep the cherry grain that everyone loves. If you look at the legs on this table, you can still see the crazy grain pattern that it has. I have noticed that over time, this does not change but actually gets more enhanced and deeper.
Monday, January 5, 2009
Pencil Post Bed - Cherry - Part 2
Ok, so in Part 1 I went through the process of prepping all the stock for the posts and rails; this was by far the longest part of the whole build process. After that was done, it was time to shape the posts. This part was BY FAR the most nerve wracking part of the process. After having gone through all of the trouble to make the boards nice and flat, and square, one misstep would have ruined the whole post. So, the first thing I needed to do was a build a jig, a long jig. I went to the local "big box" store and found the straightes 2x6 board I could find; I was fortunate to get a good one. Next I had to build a sort of indexing system (this came from the plans I went by to build the bed). Basically, it's two sqare disks with holes drilled at vaious points; these points give you the tapers that you need. In the case of this bed, 4 sides were tapered all the way through; the other four side had stopped tapers, more on that later. Basically, how the indexing jig works is, you drill a hole in the center of the bottom of the post; this is how the post will rotate/spin. Next you screw the reference disk to the bottom of the post, aligning the rotation hole. This inner disk has the 8 holes drilled into it for the tapers, each one is numbered so you know what order to make your cuts. The outer disk only had two holes, one for the pivot point in the center, and another indexing pin that matches the 8 other holes that were drilled through the inner disk. Below is a picture of the whole setup.
Once I had the whole thing built, it still took me over an hour to get up the nerve to make the cuts! Once I got started though, it was a piece of cake. Here is a shot, not a great one, looking back down the jig.
And here are all four posts done with the tapers.
Now, remember that 4 sides on each post recieve a stopped taper. This is becuase I chose to include the lambs tounge detail. Using a pattern, I outlined the curve on each side of the posts and used a carving knife, file and sandpaper to do the details; 16 in all (4 each post). This was not nearly as hard as I thought it would be. I have a picture of the finished product below.
Basically, that was all of the hardest parts. The only other challange was drilling long, straight, holes for the bed bolts for the rails. I simply used a dowel jig to get the hole started and then finished it up. Below are some pictures of the final project.
Lambs Toung detail:
Rails:
Whole bed:
The finish is sort of my own making I suppose. The bed is cherry, so I really just wanted to put some boiled lindseed oil (BLO) on it and some wipe on polyurethane, but my wife wanted a darker, aged look. So, what I typically do now is, I will put a heavy coat of BLO onto the piece and let it soak in good. Then, I use at least 3 coats of Watco, walnut colored, Danish oil. Simply wipe it on with a rag, let it set for a minute, and wipe off any that remains. The key to this is to have the surface as smooth as possible. Then, I simply put on 5 coats of a satin wipe on poly.
Overall, this was one of my most challenging projects, again due to the size, but it was pretty fun looking back on it. Let me know your thoughts...
 |
| From PencilPostBed |
Once I had the whole thing built, it still took me over an hour to get up the nerve to make the cuts! Once I got started though, it was a piece of cake. Here is a shot, not a great one, looking back down the jig.
 |
| From PencilPostBed |
And here are all four posts done with the tapers.
 |
| From PencilPostBed |
Now, remember that 4 sides on each post recieve a stopped taper. This is becuase I chose to include the lambs tounge detail. Using a pattern, I outlined the curve on each side of the posts and used a carving knife, file and sandpaper to do the details; 16 in all (4 each post). This was not nearly as hard as I thought it would be. I have a picture of the finished product below.
Basically, that was all of the hardest parts. The only other challange was drilling long, straight, holes for the bed bolts for the rails. I simply used a dowel jig to get the hole started and then finished it up. Below are some pictures of the final project.
Lambs Toung detail:
 |
| From PencilPostBed |
Rails:
 |
| From PencilPostBed |
Whole bed:
 |
| From PencilPostBed |
The finish is sort of my own making I suppose. The bed is cherry, so I really just wanted to put some boiled lindseed oil (BLO) on it and some wipe on polyurethane, but my wife wanted a darker, aged look. So, what I typically do now is, I will put a heavy coat of BLO onto the piece and let it soak in good. Then, I use at least 3 coats of Watco, walnut colored, Danish oil. Simply wipe it on with a rag, let it set for a minute, and wipe off any that remains. The key to this is to have the surface as smooth as possible. Then, I simply put on 5 coats of a satin wipe on poly.
Overall, this was one of my most challenging projects, again due to the size, but it was pretty fun looking back on it. Let me know your thoughts...
Saturday, January 3, 2009
Pencil Post Bed - Cherry - Part 1
A few years ago I decided to undertake a project that I thought would be no problem; a King sized pencil post bed. After all, it' only had 9 pieces, how hard could it be? Well, the challenge with this bed was the fact that I had not dealt with single pieces of wood this large as a finished size. First, it is important to note that all the pieces are made from a single piece of solid cherry, not pieces glued together to make thicker pieces. The posts were made from 12/4 cherry, to a finished size of 2.5"x2.5" and the rails from 6/4 cherry, to a finished size of 1.5"x6". Selecting the stock was tricky because I needed to find pieces wide enough, long enough, and relatively straight enough; I needed as straight of grain stock as I could find.
So, after picking through stock at my local lumber store, Peach State Lumber, I came home with this stash.
The pieces were pretty straight, no curves or bows in them, but they did have a cup in them. With all pieces having a finished length of over 70+", they were too big for my power tools so it was off to hand tools. I started by hand planing one side as flat as possible, then I could feed it through my power planer. This is the setup for hand planing them flat.
You can see in this picture below how I use chalk to keep up with my progress, while also checking with a square. Anywhere chalk shows up, I know there is still more to be taken away.
Finally! After a couple days of planing, and thinking my arms were going to fall off, I have a flat side.
Now that I had one flat side, I could use my power planer to do the other side and go to final thickness. I had to use some out feed supports due to the length.
Once I had all the pieces milled to thickness, it was back to the hand plane to flatten and smooth one edge.
Once that edge was smooth, I could rip the pieces on the table saw to near finished width, leaving myself a little room for cleanup with a hand plane again.
That takes care of the milling of all the wood. In the next part, I will talk about the process of creating the pencil tapers, and how nerve racking that was, as well as creating the lambs tongue detail.
So, after picking through stock at my local lumber store, Peach State Lumber, I came home with this stash.
 |
| From PencilPostBed |
The pieces were pretty straight, no curves or bows in them, but they did have a cup in them. With all pieces having a finished length of over 70+", they were too big for my power tools so it was off to hand tools. I started by hand planing one side as flat as possible, then I could feed it through my power planer. This is the setup for hand planing them flat.
 |
| From PencilPostBed |
You can see in this picture below how I use chalk to keep up with my progress, while also checking with a square. Anywhere chalk shows up, I know there is still more to be taken away.
 |
| From PencilPostBed |
Finally! After a couple days of planing, and thinking my arms were going to fall off, I have a flat side.
 |
| From PencilPostBed |
Now that I had one flat side, I could use my power planer to do the other side and go to final thickness. I had to use some out feed supports due to the length.
 |
| From PencilPostBed |
Once I had all the pieces milled to thickness, it was back to the hand plane to flatten and smooth one edge.
 |
| From PencilPostBed |
Once that edge was smooth, I could rip the pieces on the table saw to near finished width, leaving myself a little room for cleanup with a hand plane again.
That takes care of the milling of all the wood. In the next part, I will talk about the process of creating the pencil tapers, and how nerve racking that was, as well as creating the lambs tongue detail.
Subscribe to:
Posts (Atom)