
Be safe!
Showing posts with label Cabriole Legs. Show all posts
Showing posts with label Cabriole Legs. Show all posts
Wednesday, July 28, 2010
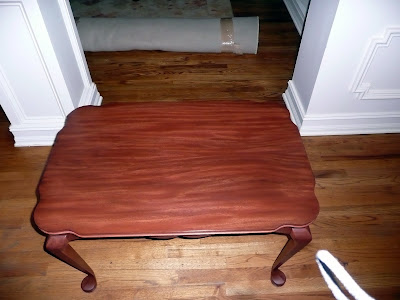
Coffee Table Done!
Wow, it has been forever since I have posted anything! I finally finished the coffee table I was working on. It took a lot longer this time because the top really gave me fits. The wood has some amazing figure/grain in it, but that is also what makes it so hard to work with. I ended up having to build the top three different times before I got it to come out right. Here are some pictures of the finished product.


Saturday, March 27, 2010
Coffee Table build
I've made some progress on the coffee table. I am glad I kept all my jigs and templates from the last time I made this table; it is saving me a lot of time. My next task was to mill all the rough pieces down to final dimension to get them ready. Here I am sawing the 12/4 pieces down to make the aprons, which are 3/4.
Here all the apron pieces are roughed out and now just need to be planed to thickness.
I also cut the leg blanks to size and planed them to final thickness, which is 2.75" square.
So, I will let those pieces sit overnight and then begin to cut the cabriole legs next time.
Be Safe!
 |
| From ChrisJanetCoffeeTable |
Here all the apron pieces are roughed out and now just need to be planed to thickness.
 |
| From ChrisJanetCoffeeTable |
I also cut the leg blanks to size and planed them to final thickness, which is 2.75" square.
 |
| From ChrisJanetCoffeeTable |
So, I will let those pieces sit overnight and then begin to cut the cabriole legs next time.
 |
| From ChrisJanetCoffeeTable |
Be Safe!
Monday, January 26, 2009
Cabriole Legs - Take Two
Ok, so I was not really pleased with my first cabriole leg design, so I decided to have another go at it. Using the template from my previous post I prepared another pine blank from a couple 2x4".
After it was dry I took it down to the final dimensions of 20" long by 2.75" square. I then traced the pattern onto the two adjacent sides.
Then it was over to the bandsaw to cut it out. I made the first cut, saving the piece and taped it back on to provide support while cutting the second piece; simple blue tape works fine.
Finally, I had my ruffed out leg. You will notice in the picture below that the post is still the 2.75" square blank size; this is so I can put it on the lathe to turn the foot.
Before I turn the foot though, I need to relieve some material on the heel so I will not hit it while on the lathe. Here I have marked out the area I need to relieve; I will do that with a spokeshave.
Now to the lathe to turn the foot. All I want to do here is round out the bottom of the foot and define the pad. You can see in the picture below that I have drawn a line to where I want the pad to be, it's a little big on this one and will be refined on the final version.
Finally, after some turning and some work with a combination of the spokeshave and rasp, I have a more "finished" product. Also note that after I was done with turning the foot that I cut the posts back on the bandsaw.
I posted this over on T-Chisel's forum and received some good feedback about rounding the edges a little more and making it with a little more "sweep" instead of being so straight so I need to look into that.
 |
| From Coffee Table |
After it was dry I took it down to the final dimensions of 20" long by 2.75" square. I then traced the pattern onto the two adjacent sides.
 |
| From Coffee Table |
 |
| From Coffee Table |
Then it was over to the bandsaw to cut it out. I made the first cut, saving the piece and taped it back on to provide support while cutting the second piece; simple blue tape works fine.
 |
| From Coffee Table |
Finally, I had my ruffed out leg. You will notice in the picture below that the post is still the 2.75" square blank size; this is so I can put it on the lathe to turn the foot.
 |
| From Coffee Table |
Before I turn the foot though, I need to relieve some material on the heel so I will not hit it while on the lathe. Here I have marked out the area I need to relieve; I will do that with a spokeshave.
 |
| From Coffee Table |
Now to the lathe to turn the foot. All I want to do here is round out the bottom of the foot and define the pad. You can see in the picture below that I have drawn a line to where I want the pad to be, it's a little big on this one and will be refined on the final version.
 |
| From Coffee Table |
Finally, after some turning and some work with a combination of the spokeshave and rasp, I have a more "finished" product. Also note that after I was done with turning the foot that I cut the posts back on the bandsaw.
 |
| From Coffee Table |
 |
| From Coffee Table |
I posted this over on T-Chisel's forum and received some good feedback about rounding the edges a little more and making it with a little more "sweep" instead of being so straight so I need to look into that.
Subscribe to:
Posts (Atom)