So, with all this in mind, I decided on the final dimensions and design. This one will be 12" deep, about 42" wide and about 36" tall. It will have 3 shelves with each shelf capable of holding about 4 books side by side and roughly 3 or 4 deep. I also decided that this piece will be made in cherry and the finish will be BLO and shellac, no stain.
My first order of business as was to make a trip to Peach State Lumber and get the cherry I would need for the project. I decided I wanted 8/4 cherry so I could resaw it for the sides, since I knew I would have to glue two pieces together. I literally had to go through the entire pallet to find the boards that would work for me, but sometimes you have to do that. So, here are the boards I picked up:
 |
| From Book Nook |
I did get more than I needed because I will be using the rest for another project once I'm done with this. My first order of business was to mill the lumber square so I could resaw it on the band saw. Some of this required the use of hand tools, which I don't mind.
 |
| From Book Nook |
Once that was done, they were resawn on the band saw and laid out for glue up. Here you can see the book matched pieces, ready for glue up. I always make some kind of witness mark on the boards so I know exactly how they should be put together.
 |
| From Book Nook |
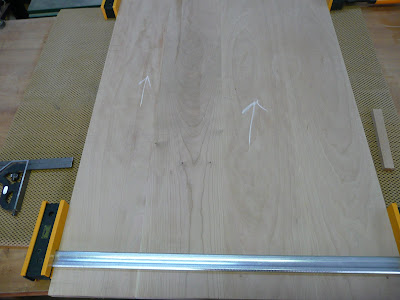
Once I had both side panels glued up, it was now time for the tedious process of laying out for the 3 shelves. I wanted them to be equally spaced both vertically and horizontally. I did this by laying them back-to-back so that I could just transfer the lines from one to the other and know they were in perfect alignment. Here are the two side pieces laid back-to-back with the insides facing up.
 |
| From Book Nook |
Also note that I make sure to mark the grain direction; that is was the arrows are for. This just helps me keep everything flowing the same direction. Next, I had to do all the layout lines, which took a good while because I wanted to be exact and there were some design features that I had to take into account. After the layout was done, I used a router to rout out a 3/8" deep dado for each shelf and then used chisels to square up the dados.
 |
| From Book Nook |
So, my next order of business is to mill up the pieces that will be for the front and bottom trim. These trim pieces will serve multiple purposes. First, they will have a dado in them that will allow them to fit into the shelves so that will help to keep the shelves from sagging by adding support. Next, they will stick up from the front edge of the shelf about 1" which will provide a lip for the books to set into so they don't fall off the shelf and lastly, the will have a profile on them to add character. Once I have those trim pieces done, I will also begin to build the back of the shelves. That is all I've got for now....
Be Safe!
Nice! I cant wait to see the finished product. Plus I learned what a Book Nook was. Thanks!
ReplyDeleteDerik....I love the play by play! Thanks again so much. So looking forward to having this for our little guy!
ReplyDeleteLooks like you found some good lumber too bad you had to dig through the whole pile. I love going to Peach State lumber but always spend too much.
ReplyDeleteVery nice looks great keep up the good work!
ReplyDeletewoodworking how to