Monday, December 5, 2016

Building an Outdoor Table (Part 3)

In this post, we are going to wrap up this project; I'll talk about the joinery I used, and why and then get into the finish for this outdoor table, and why. To recap, in Part 1 of this series, I went through the table design and the wood I selected for this project, which is white oak. In Part 2 I focused on milling the wood and prepping the individual pieces for the joinery. I also covered the layout of the pieces to try and orient them the best way possible to give the greatest visual appeal. In this post, we are put it all together and get it to its final resting place.

Joinery - Drawboring

As with any table, the obvious choice for the apron to leg joint is a mortise and tenon joint. It is a strong joint and has been used for centuries because of its durability and strength. So, when I was planning this table design, I knew I was going to use a mortise and tenon joint, but I also decided to take it one step further and add a drawbore to the joint. I covered what a drawbore joint is, and how to make one in this post so I suggest you hop over and take a look to get more of the details.

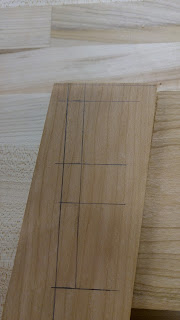
In order to make this joint, I had to use my drill press to drill out the bulk of the material; these legs were too tall for my mortising machine, which was a disappointment and I may have to address later on down the road. As you can see in the photo below, once the mortises were rough drilled out, I had to finish the joint by hand with a mallet and chisel. 

One thing I should mention is, I had already cut the tenons and used the tenons to layout the mortises. You can see the layout lines in the above photo. Once the mortise and tenon joints were done, I dry fit everything everything to get a feel for what the table would look like.

It was at this point in the process that I also noted that the table looked too boxy and needed some help. What I decided to do was to put a very slight taper on the two inside faces of the legs, meaning, the side where the table rails are. However, I wouldn't cut those tapers until I have the drawbores done. Below you can see the table base completely assembled and you can also see the slight taper I put on the legs; nothing too much, but just enough to give it a little something.

Once this glue dries, I just need to trim the dowels from the drawbore pegs and finish sand.

Outdoor Finish

You can go back to Part 1 of this build and read why I chose white oak for this project, but since this table is going to be outdoors, year around, I wanted to select a highly durable finish. So, I did some research on this and there are a number of finishes that you can use for outdoors, of course there are. But many of them require near constant attention and refinishing annually; I didn't want that. So, I drew upon my boating hobby, as I did in selecting white oak (boats used to be, and are still, made from white oak) and I decided to go with Epifanes clear varnish finish. Epifanes is used in the boating industry to be a sealer for wood on boats, to protect it from the water and sun, which is exactly what  I wanted with this table. 

The application of Epifanes is kind of a hurry up and wait process. You thin the product out 50/50, apply, then let dry for about 24 hours. Then you thin less and less as you build up the coats. In all, this table has 5 coats of Epifanes on it. This Epifanes finish should last a few years before needing to be recoated. The nice thing about it is, you just need to give the piece a light sanding, then apply a couple more coats and then you should be good for a few more years. So, here is the finished table in its final resting place and ready for years of use.

That is all for now. I have a few other things in the works, and possibly a big announcement in the not too distant future so stay tuned!

Monday, November 28, 2016

Outdoor Table (Part 2)

In the first part of the outdoor table build, I started with the design, wood selection and then I began to mill the pieces for the legs. In this second part of the build, I am going to focus on milling the rest of the boards for the project. That means the top, the aprons and finishing the legs. From there, it will be off to shaping the legs and doing the joinery, then the finish.

The Top - Layout

This is my first time working with white oak, and so far, I like it. I'm not a big fan of oak in general, but that is just because I prefer other woods, such as walnut, cherry and mahogany. When working with the pieces for this top, the wood, in its rough sawn form, I find it a bit of a challenge to imagine what the pieces will look like after they are milled. This is a shot of the pieces prior to milling:


To me, it is not easy to see what is under there, but we'll mill it and see what we see. After the pieces are milled, I will work with all of the pieces to see what is the best layout for the top; which is most appealing. Here are the pieces after the initial milling:


I think I got some good grain matching, but I also tried to get the pieces paired according to their width. Here is what I came up with for the top layout; then off to the clamps.


I'm happy with the way this came out. Some of the pieces were pretty gnarly on the edges and so milling was a bit tricky. I tried to limit the amount of white, sap wood, and get nice grain. At this stage, I let the pieces sit overnight, then put them over the jointer and through the planer to their final thickness. Then, off to the clamps for the glue up. While that was drying, I milled all the rest of the pieces. Here is the final stack of all the pieces required for the table; note the giant laminated legs.

In the next post, I will cover the joinery used for the legs and aprons (hint: you can find that here). I will also dry fit everything and get it ready for final sanding and the finish. So, in part 3, we will wrap this beast up and get it done!

Monday, November 14, 2016

Building an Outdoor Table

A friend of mine recently bought a house here in town and the house has some really great outdoor space in the back. He has a nice deck, that leads down to a nice patio where there is a hot tub and a pool. The house has a large built-in gas grill, but he is more of a Green Egg guy, so he bought a really big cedar table that the Egg sits in and then has a large granite top; huge space. The one thing that was missing was a large table to entertain people outside after all that cooking on the two grills. So, he asked if I could build him a large dining table for the deck and I said "of course!".

Design

He wanted a table that would be able to comfortably seat 6 people, with unobstructed leg room. He also wanted it to have look hefty; a.k.a, manly. We kicked around the idea of a trestle style table, but he wasn't keen on the idea of people potentially hitting their legs on the cross members. So, we decided on just a traditional 4 leg table, but with the legs pushed to the edges of the table for maximum room. The legs are going to be 5" square, BIG! I also had in my mind that we would put a little taper in them, but I wanted to wait until the legs were milled up before bringing up the idea.

The table was going to have smaller than normal aprons connecting the legs to allow for someone to pull real close to the table if need be. Lastly, the top was going to an inch thick with the boards running the length of the table, not laterally as is often done on long tables. For the top, I had recommended breadboard ends, which he ultimately did not want, but I think he may ultimate regret that (more on this later on). The reason I pushed for the breadboard ends is that it helps to keep the top flat by not allowing it to bow and cup, but still allows for the wood to move with natural, seasonal expansion and contraction. 

Wood Selection

Because this table was going to be used outside, I needed to select something that was going to withstand the punishment. Here in the South, we don't have extreme seasonal swings, but we do get a taste of all four season, but Summer is the most brutal with the heat and humidity. At first we were going to use White Cedar, but I could not source pieces thick enough for our use. My second wood of choice, which is what we ended up selecting, was White Oak. I had done a lot of research on the use of White Oak for outdoors and it had great results. I also figured, if they can build ships out of it, that last hundreds of years, why not a table?

So, off to my favorite wood store, Peach State Lumber here in North Atlanta. This is my go-to store because they have just about any kind of wood you want, in just about any size you want. So, I had done all the calculations of the amount of wood I thought we would need, and loaded up. 

As usual, I always get rough sawn wood and then mill it myself. I have the equipment and it saves money.

Bottoms up!

In building the table, I wanted to start with the legs first, for a couple of reasons. First, the legs were going to set the tone for the overall table. Second, to get the desired leg thickness, I was going to have to laminate 3 pieces together so this was going to require extra milling and glue time, which meant it was going to be the most time consuming part of the project. Once we joined and planed the pieces nice, smooth and clean, we glued them up.

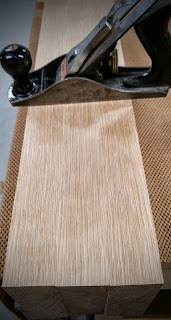
Once the the glue was good and dry, I used a card scraper to get the bulk of the glue nibs off, and then I used a No. 4 to clean up the rest. 

Once I had the glue cleaned off, I ran the pieces over the jointer again, to ensure they were square, and then finished them in the thickness planer to mill them to their final dimensions. The result is some very big table legs! 5"x5" White Oak. Each leg probably weighs in the neighborhood of 40lbs.


Next Steps

The next part of the project will be to begin milling the boards for the top and the aprons. Once the aprons are milled, then it will be time to do the mortise and tenon joinery. So, come back for Part 2 of the outdoor table build and see how we handled that process. Thank you and be safe!


Wednesday, October 19, 2016

Drawbore, not so boring!

For my next project, which is going to be a big outdoor table, I've decided to try something new; drawboring. I've wanted to try this for quite some time now and I'm finally biting the bullet and going for it.

What is Drawboring?

Drawboring is done in a mortise and tenon joint and is similar to a pegged mortise and tenon joint, but instead of simply drilling a hole through the mortise and tenon, and inserting a peg, the hole drilled in the tenon is offset by about a 1/16 of an inch. This is done so that, when the peg is hammered through the joint, it draws the joint together very firm and creates a very strong mechanical joint. In fact, some people don't even use glue with a drawbore joint because it is so strong, but I think glue is still a great idea, you know, just in case.

What do I need?

In order to create a drawbore joint, you don't necessarily need anything special, but I will recommend getting getting a set of drawbore pins. I ordered a 3/8" pin from Lee Valley to match the size of the drawbore pegs, or dowels, I am going to use. A drawbore pin is a tapered piece of smooth steel that, once you have the joint prepared, you push the drawbore pin into the joint to "loosen" the joint a bit so the peg or dowel will be able to make its way into the joint without completely breaking the peg.

How to?

So, how do you make a drawbore joint? Christopher Schwarz has a really good article on drawbores that I suggest you check out for some great details. If you are, like me, more of a visual person, Paul Sellers has a good YouTube video on his channel. There are several others that have examples of how to make a drawbore joint as well.

The basic premise of the drawbore is actually pretty simple. First, make a standard mortise and tenon join, nice clean joint, firm fit, etc. Next, disassemble the joint and drill a 1/4" or 3/8" hole through the side of your mortise joint. I suggest clamping a scrap piece to the back of the mortise so you don't have a blowout on the back side; always start drilling on the show side so it stays nice and clean.

Next, put the joint back together and insert a brad point drill bit the same size as the hole you drilled. I prefer a brad point because it has a nice sharp tip on it that will give you a crisp center mark. Insert the bit into the hole that was drilled in the mortise and give it a light tap to make a mark on the tenon. Do this for all joints.

Once you have done that, take the joint back apart and locate that tick mark you just made. Now, make another tick mark about 1/16" towards the shoulder of the tenon; that is key. If you go the wrong way, you will actually loosen your joint. Next, drill a hole through the tenon on that mark closest to the tenon shoulder. Once all those are drilled, reassemble the joint and use your drawbore pin and carefully push it into the joint to make way for the peg, then remove the pin.

The last thing to do is to take your peg or dowel and taper one end of it so that it can get into the joint without getting hung up. Put glue on your mortise and tenon joint, put some glue on the tapered end of your peg, and carefully drive the peg into the hole until it comes out the backside of the joint. You now have both a mechanical and a chemical bond in your joint with virtually no way to get it apart and should last a lifetime.

Final Thoughts...

So, that is the quick and dirty of the drawbore joint, I will provide a little more visual elements when I get to make the joints for this table. In the meantime, check out the resources above or just do a Google search for "drawbore joint" and you will get a lot of material. I suggest giving the joint a try; it is a very strong joint and also adds a nice design element to your piece. You can use all different types of shapes, sizes and colors of pegs that help your joint standout. Experiment and have fun with it!


Monday, October 17, 2016

Office Desk Build (Final)

In Part 2 of the Office Desk build, I covered the joinery process for the base, which was all mortise and tenons. In the final part, we sort of put a lid on this project by putting the top on and going through the finish.

Top Construction

The tops finish thickness will be 3/4" so I started with 4/4 rough cherry and milled it down. As you may recall in the Part 1 post, I had already laid out what pieces the top would come from. I do find though, that you really don't make that final decision on which pieces go where until you've run the pieces through the jointer and planer and see the true grain patterns. 

The milling process is pretty standard stuff; start with the jointer, get one face flat, then use that face against the jointer fence to get one edge straight and square to the face. Then, over to the planer to get the pieces to their final thickness. Once that is all done, I lay the pieces back out to get the best "show faces" and grain patterns that are most appealing to me.

This pattern was the one I liked the best, so once I have it the way I like it, I put a witness pattern across the pieces so I know which board goes where during the glueing process. Once the glue-up is done, I use my Lee Valley bevel up smoother to get rid of mill marks and any glue residue on the top.


Shaping the Top

While thinking through the design of this desk, I really didn't want to just have a plane square top. I wanted the top to be a little different, a bit more inviting and have a nice look to it. What I came up with was to make the front edge have a concave curve to it. I felt that, this way, you could really get your chair up close to the desk, and have a natural place for your arms to rest nicely. Here is that edge:

Once I formed this edge (on the bandsaw by the way), I used my Lee Valley spoke shaves to create a rounded under bevel on the bottom edge of this curve, which you will see in the finished pictures below. I thought this would be a nice details and trick of the eye and, honestly, I was just playing around with ideas at this point and, since the piece is for me, I can do that.

Finish and Finished Product

The finish on this piece follows the principles I try to usually follow, keep it simple and natural looking. So, for this piece I opted for a Tung oil finish, about 3 coats then a wipe-on polyurethane over that (after letting the oil set for a couple weeks to fully cure). The wipe-on is an oil based, cut 50/50 on the first two coats then about 75/25 on the last two coats. Very light sanding in between coats to remove dust and nibs. I then used 00 steel wool with some furniture wax to rub it out and then buff it to a nice smooth finish. 

Here are a couple photos of the finished product, the first one shows that under bevel on the front edge of the top.

Finished product:

Lessons Learned - What's Next?

As with anything, I like to learn something from a project, whether it is a technique or design element. On this project, I hand chopped my first mortises, which was fun, but a lot of work. I don't think I could have reliably done it with a machine so I was "forced" to learn this method. Second, if I re-think the design, I think I would curve the front apron on the base to look similar to the curve on the top; I think that would have been a nice design element and made the desk even more inviting; maybe next time.

My next project is going to be an outdoor dining table for a friend of mine who recently bought a house. This table will be made from white oak, which is very reliable for outdoor furniture. Check back in, or subscribe to the blog to get updates on this beast of a table!

Tuesday, September 13, 2016

Office Desk Build (Part 2)

In my last post, Office Desk Build (Part 1), I went through the milling process of the wood and getting the legs and frame of the desk mocked up. In this post I want to concentrate on the joinery of the legs and desk aprons. The joiner, at first, can be a bit intimidating because the legs are on angles. The front legs are on 7 degree angles and the back legs are 3.5 degrees. It is highly important to create a template with these angles so you can keep track and always have something to come back to as a reference. If you are using an adjustable square, having this template allows you to come back and reference the template to get your angles correct. The other tip here is to try and do everything with the same angle at the same time. What I mean here is, do everything possible with the 7 degree angle first, then move to the other angle. This keeps you from having to go back and forth, which can cause some errors.

Tenons First

Because the legs are on an angle, I chose to cut the tenons first. I did this because I was going to have to pound out the mortises by hand. Because of the size (width) of the table aprons, I chose to use double tenons. The reason for this all about stability. If you make a really big tenon, you would need to make a really big mortise and this could compromise the integrity of the joint because you would have to remove so much material from the legs. First, I layout the tenons, and I cut these by hand.

Once I get the tenons cut, you want to stay outside of your lines, I use chisels and hand planes to fine tune the tenons down to the lines. Just take your time and sneak up to the lines.

Mortises Next

Once the tenons are cut, I move on to the mortises. I use the tenons as my "template" to layout the mortises. Also, make sure you number your joints from the aprons to the legs. You should have a "1" and "1" on the tenon and mortise joints, then "2" and "2" and so forth. The reason for this is, each joint will fit just a little bit differently, no matter what you do. This ensure that you are matching up each one the same, every time. So, use your tenons, and layout your mortises.

Once you have your mortises laid out, it's time to get chopping! Using your mallet and chisels, just take your time and start chopping to your lines. Don't start chopping at your lines, start about a 1/16" away from the line, remove most of the waste, then work to the line.

Take your time, get a good snug fit and then dry fit the whole assembly.

Finishing Touches

Once you have all your joints dry fit and nice and tight, ensure all your parts are sanded to your liking and then it is ok to glue up the base and get ready for the top.

Final Thoughts/Tips

In woodworking, joinery is everything. You can have the best hand carved finial, or elaborate veneer, but if your joiner isn't any good, the piece will not last and will end up in a scrap heap somewhere. To ensure the longevity of your work, you want to ensure you have great, strong, joinery.  To do this, take your time, layout your joints carefully, sneak up to your lines with cutting the joints and break each task down to their most simple parts. 

Up Next

In part three, I will put a top on this desk and get it finished. I'm going to do a couple things different on this top so check back and I think you'll like what I do with it.

Tuesday, April 12, 2016

Office Desk Build (Part 1)

Now that my new shop is in mostly working order, it is time to build something! The first "major" build is going to be an office desk for our house. The design called for something "a little different" which really just meant, not the usual straight legs. Because the area where the desk is going is not really large, and also not a primary working space, it does not need to be very big nor complicated. Of course, I've been given "artistic license" to make some modifications as I see fit, provided the are not too drastic; whatever that means. Basically, this desk will have legs that are slanted on an angle in the front and the back; 3.5 degrees to the back and 7 degrees to the front.

The Lumber - Milling

The desk will be made from all cherry, which I procured from my favorite store, Peach State Lumber. It calls for 4 legs, 4 aprons (2 side, front and back) and a top. There won't be any drawers so that this does not become a catch-all for random "junk". I usually get started with a chalk layout of my pieces, as I picked them in the store.

Because I am not using plans, and sort of making this up as I go, I thought I would start with the legs. I kind of came up with the 3.5 and 7 degree dimensions by using a piece of 1x4 pine material and a compass square to find an appealing angle. In the picture above, you can see that I marked a triangle for the legs so that I can try and keep them oriented as best as possible as I go through the process. Once I rough cut them, I will mark them with pencil on their ends in the same manner. Here they are milled to near final dimensions, which is 1.25" wide by 2.5" deep (thick) by just over 30" long.

Measuring and Layout

Once the legs were milled to dimension, I needed to determine an appealing length and layout for the two side aprons. Here, I simply have the milled apron piece clamped to the legs so I can come up with an appropriate length.

This length needs to take into consideration how deep the top of the desk will be and the front and back overhang of the top. Too big and there won't be a lot of room, too small and it could make it unstable. Once I determine the apron length, I can make a pencil mark to define the shoulder of the tenon that will be cut into the apron; I will be doing double mortise and tenon joints on these legs because the aprons are 5" wide and one long tenon would, in theory, not be as strong as splitting it up. 

Next Steps - Lessons Learned

The next step will be to cut the tenons into the two aprons. I will be cutting these by hand as I think it will be easier than trying to mess with multiple machine setups and potential mistakes. Once the tenons are cut, I will use those to mark for the mortises, which will be cut on a mortising machine; I "cheated" a little on how I did this so you'll have to see what I did.

I also wanted to close with a little lessons learned; I think it is important to impart things I figure out along the way, for those that may not have done this before. None of this is the "right way" per se, just how I did it. First, make sure you have a good compass square that can really lock in place. Second, as far as possible, make all layouts for that particular angle at the same time. For example, I measured all my 7 degree angles before moving on to my 3.5 degree measurements. If you don't do this, take the time to mark and cut a scrap piece that has these measurements on it so you can quickly get your measurements from it later if you need to. Lastly, similar to the measurements, make all angled cuts for the same setting at the same time. This keeps you from having to move your miter gauge back and forth and having errors, or worse, losing track of which cut is supposed to go where and making a mistake. 

So, next time it will be mortise and tenon cutting time and, hopefully, a dry fit of the two sides.


Tuesday, April 5, 2016

The State of Woodworking - My Opinion

As I mentioned in my last post, I have been out of woodworking for about 5 years, until recently. It is really interesting to see how much and, at the same time, how little, things have changed in the woodworking world in that period of time.

Woodworking, like many hobbies or professions, is full of people who all think they know the right way to do something; that has not changed one bit in the last 5 years. In fact, in some ways, it is worse because of the anonymity of the Internet and Social Media. Ask someone, "what the best way to sharpen a chisel?", than grab your popcorn and watch everyone go at it. "What is the best way to cut a tenon?" Watch out. Oh, and what about "Grizzly versus Powermatic?" Oh boy! Is there a right way to do things? Sure, but there are many "right ways", one just may seem better to one person than another. Or, one method may work better for someone, or be a more appealing way to do it, but is it "the wrong way"? Surely not. The question isn't how you sharpen something, such as a chisel, it is the fact that you should sharpen them. How you do it and how sharp you get them is up to you. And, not how you make a mortise and tenon joint, but is that the appropriate joint to use in that given situation? The fact that everyone has an opinion, and is willing to share it, whether you want it or not, is not lost on me; it's in the tile of my post for crying out loud. However, the manner in which people treat others in some situations is astounding, but not surprising in the Internet age; which leads me to my next point, which fascinates me.

When I was last doing woodworking, Facebook was still pretty new, Twitter was new and Instagram didn't exist. Heck, when I started woodworking 12+ years ago, none of that existed. When I was at the height of my woodworking, you had a very small set of woodworking video bloggers (vloggers). The ones I watched were The Wood Whisperer (Marc Spagnuolo) and Rough Cut (Tommy MacDonald), back before he even had his own show. I remember watching these guys, putting themselves out there, giving tons of information away for free and yet people would blast them for one reason or another; they don't like Marc's jokes, can't stand Tommy's accent, etc. I just kept thinking "jeesh, people pay good money for this kind of access, we should be thanking them!"

So, when I recently got back into woodworking, I was pretty surprised by the sheer numbers of vloggers out there now, it blows me away! Marc is still killing it, Tommy has a show now, than there is April Wilkerson, The Samurai Carpenter, Paul Sellers and many, many more. I am amazed at their confidence and courage to film themselves and just put it out there for everyone because, as we all know, the Internet can be a nasty place.

What I like most about all of these different people is that they each have their own way at doing something, none of them are wrong, they all get to the same place in the end, but the point is, they are just showing you a way to do something, not the way. I like to watch them all and take bits of information from each and than come to my own way of doing something as well. What this blog is, is the result of watching, listening and learning from others, and coming up with my own way of doing something and I only hope that someone finds it useful as well.

As long as all these people are willing to continue to put themselves out there, and as more and more people do, I think the woodworking community is in a better place than maybe it ever has been.

Who are some of your favorite woodworking bloggers and vloggers? Let me know in the comments and I'll look forward to checking them out!


Wednesday, March 30, 2016

Where have you been all this time?!


Wow, it has been a long time! It is hard to believe that my last post was January of 2011. A lot has changed for me since then, which is why I haven't been posting in a while. The biggest reason is because we have moved...twice and as a result, all of my woodworking equipment had been in storage. However, part of all these moves and changes is the fact that I have had the opportunity to build myself a standalone "dream shop"! So, my power tools have been rescued and are now in their new home. So, let's start there, the new shop...

I have been blessed with the opportunity to build myself a free-standing wood shop, a blank slate, to turn into my dream shop. So, I built a 32'x24' shop with 10' ceilings. Here is a shot of it being built.


As you can see, it has two garage doors on the front, a side entrance and it also have two windows on each end. I also installed two, powered, attic exhaust fans in the roof that I can control with a switch. I did this in order to circulate hot air out, but to also exhaust any fumes when doing finish work.

Working with a blank slate is a dream, but in some ways, also a bit of a nightmare; where do I put things? Where will lumber go? Where do I put this piece of equipment and that piece? Etc, etc. It is fun though and, let's be honest, a shop is never truly "done" is it? In designing my shop, I knew I wanted a few things for certain. First, I knew I wanted the outlet boxes to be cabinet height, that way, any cabinets or equipment that I put against a wall will not block any outlets. Second, I wanted lots of 110V and 220V outlets scattered throughout. Next, I wanted all 110V outlets to be quad outlets. I knew I wanted the walls to be covered with wood paneling and not drywall. Next, as much as possible, everything should be mobile (with a couple exceptions). Lastly, I knew I wanted everything that goes on the wall to use a French cleat system, that way I can move anything anywhere as my needs change over time.

So, what did I come up with? Well, here are a few shots of my shop as it is so far (subject to change without notice of course). This first shot is the right hand wall as you enter the shop. This is where all the lumber comes in, gets stored and broken down for projects.

I have my miter saw down here, along with a circular saw, jig saw and track saw, which are stored in the same mobile cabinet that my miter saw is on. This means that most, of not everything, I need to break down everything from rough lumber to sheet goods is all in one place. Now, I chose to store my lumber vertically for a couple of reasons. In my last shop, I stored it horizontally, and it took, basically an entire wall. It was also really hard to sort through the lumber in a meaningful way like that. By storing vertically, I can store a lot more lumber in a smaller area and it makes it so much easier to sort through. Here is a link to a more detailed picture of the lumber storage, but it is basically black pipe flanges and 12" pipe bolted to the wall. The wood also sits on a wooden "step" on the floor.

As we move from right to left, we begin to see how wood also moves through the process as you now run into the jointers (I have a 6" and 8") and planer.

So, after I break down the pieces, I can simply turn around and than begin to mill the pieces. Once they are milled, you move to my workbench and table saw; the heart of the shop. 

There is a lot going on in this shot, and some I may need to explain in another post, but the point is, after pieces are milled, I can cut to width and length at the table saw and also begin joinery layout at the workbench. I also have clamps near the bench, you can see my Rigid sander near the bench as well; this also holds all of my power sanders and sandpaper. Because I also use a good bit of hand tools, they are stored under the bench in drawers and I have a sanding station right next to the bench as well. 

So, as you can see, the shop is not done yet, but I don't think they ever are. I still have a good bit of insulation to get installed, wall board to be hung, extension table for the table saw, etc, etc. The good news is though, it is a functional shop that I can start building projects in right now, and I already have two in the works! 

I am so thrilled to be back woodworking again and, boy, has the woodworking world changed in the last 4+ years or what?! More on that in another post maybe, but in the meantime, I am glad to be back!

Thank you all!