Wednesday, December 31, 2008

Cherry baby crib

This project was one of the more challenging that I have done, mainly because of all of the pieces. I started with rough cherry stock and a hardware kit from Rockler. The first thing I did was to mill all the pieces; legs, rails, etc. Then I had to lay out the mortises; all 90 of them!! Here you can see all 32 of the smaller vertical slats.
From BabyCrib

One of the finer details of these is that they have a stopped round over on them to ease the edge so I created a simple start and stop block on the router table and did the whole batch.

Next, I had to lay out for the mortises. I combined the top and bottom boards and laid them out at the same time to eliminate any errors and causing them to be skewed during glue up.
From BabyCrib

Then I just took them all over to my Delta mortiser and went to town. I must say that this was a major time saver for this project; highly recommended.
From BabyCrib

This is a picture of one of the ends. The middle boards are book matched.
From BabyCrib

Here is the whole thing dry fit, without the sliding gate on it.
From BabyCrib

And finally, the finished product.
From BabyCrib

The finish on it was a wash coat of shellac followed by a coat of a red cherry gel stain that was put on and wiped off quickly; just adds a little color too it, turned out nice. And finally another top coat of shellac to seal it in.

Tuesday, December 30, 2008

Built-in Dry Bar

Back in 2004, I was remodeling a house that was built in 1949. In the living room was a random two door closet. I decided to turn the closet into a built-in dry bar. I used a combination of left over Brazilian cherry and maple; I like the contrasting colors. These were the first cabinets of any kind that I had built, but they turned out pretty good I think. They are actually three separate cabinets. I had to do this because of the way the "closet" was configured so this was the only way to get the cabinets in the space. The finish is just a couple coats of Danish Oil and wipe on poly.

The first picture shows the base cabinets; I used full extension slides for the drawers and re sawed the maple for book matched doors.
From DryBar


The next pictures shows the two upper cabinets with the wine rack. The upper cabinets have glass doors on them and the wine rack will hold 15 bottles.
From DryBar


I built the top out of solid maple as well.
From DryBar


This last picture shows the "finished" product, but I somehow didn't have the top on when I took the picture.
From DryBar


Comments always welcome...

Monday, December 29, 2008

Grizzly T10010 Wet Grinder Review

So for Christmas, my lovely wife gave me the Grizzly T10010 10" wet grinder. I had been wanting a wet grinder for a while and the Tormek was out of my price range; I have some other Grizzly tools so figured for the price, what the heck.

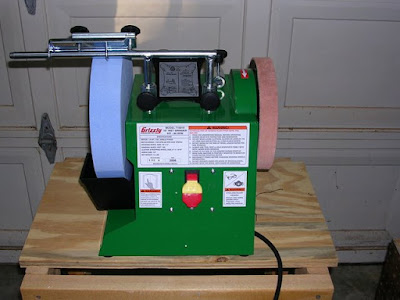
In the package is the main unit, which is essentially the motor with the buffing wheel. There is another box that contains the main grinding wheel and a small bag with the locking knobs and angle finder. Assembly is super easy, just put the tool rest in, screw in the locking knobs and bolt the grinding wheel on nice and tight. This is a picture of it fully assembled.
From Grizzly Grinder

After I assembled the unit, I filled the water reservoir and put it on. After about a minute, it was almost empty. That wheel will suck some water! You can see the water line in this picture.
From Grizzly Grinder

I refilled the reservoir and slowly turned the wheel by hand to wet the whole wheel and let it soak in the water, then refilled again. Once that was done, I turn the machine on to see how it ran; it is really quiet and very smooth, it does not wobble at all. I've had other grinders that you have had to bolt down or they would bounce all around, so that was nice.

So after all that, I grabbed one of my Lowe's purchased Stanley chisles that had a little nick in it and went to town. Getting the proper angle on the tool rest and everything is much easier than I thought. The Tormek, and Jet, have a fine adjusting knob for the up and down height of the tool rest, but the Grizzly does not; which is a shame. The shaft does fit fairly tight though so it's pretty easy to adjust. After just a few minutes of grinding, the nick was gone and I had a new edge. From there, I prepped the buffing wheel and applied some paste. I buffed off the bur that they grinding wheel creates in just a matter of seconds and tested it on a piece of cherry. All I could say was "wow"; I don't think I've had a chisle that sharp, even by hand (for some reason). This is a shot of me taking a nice little curn off of a board, the full length.
From Grizzly Grinder

The chisle just glided effortlessly and was super easy to control. End grain was no problem either; I was able to shave nice thin cuts without breaking out the back side of the board. Here is a shot of a thin shaving, the full length of the board.
From Grizzly Grinder

All in all, I'm impressed with the machine so far. I havne't spent a ton of time with it, but so far it is super easy to use and should help me keep my tools much more sharp, quicker, than I keep them now.

Saturday, December 20, 2008

My very first piece - Walnut Blanket Chest

So, several years ago now, maybe around almost 5 years, I made my "first" piece of actual furniture. It was a Walnut and Cherry blanket chest. The design came from some plans online and overall it was very easy to make. I think I would like to make another one sometime. This piece I made as a wedding present for my sister-in-law and her husband.
From HopeChest


The design was really simple; the only thing it called for that I didn't like, and would not do again, is to run the dado for the rails and panels all the way through the leg, which meant you then had to make a small "plug" to glue into the legs. If I did this again, I would use a router bit on the table and just make a stopped dado, or use my mortising machine. The finish was simple as well, just wiped on a few coats of Danish oil, let it dry, and then used a satin wipe on polyurethane. Simple!
From HopeChest

Friday, December 19, 2008

T-Chisel's Salem Secretary

This piece is sick!  The detail is amazing and if you watch his videos you will see the pains taking time and effort he puts into it.  This is definitely something I would strive towards, but I am WAY off right now.  In the words of the Chisel "who's better than me?!"  Love it!

Back to woodworking

Not that I haven't been woodworking lately, but I just haven't been blogging about it. I'm trying to get myself a bit more organized so I will be adding some content in here; things like tips/tricks, progress of my current work, past work and other items woodworking related. Check back often!